After the Darbari, my exploration of high quality speakers acquired some rules to follow, when budgets permit, and some things to be careful about. The rules to follow include:
- A 3-way is better than a 2-way, all else being equal.
- For a 3-way, the woofer-to-rest crossover is best done active, even if the midrange-to-tweeter crossover can be passive
- Baffle step compensation is not arithmetic, it’s a matter of taste. The knee frequency is confusing when enclosures are not rectangular, and the shelf depth depends a lot on the room where the speakers will finally be placed.
- Flat frequency response, on axis, other than BSC, is The Right Approach.
- You need a lot of power, a lot of cone surface area and excursion, for good bass. We keep underestimating the power needs here.
The things to be careful about were:
- The physical size and build of the Darbari may not be everyone’s cup of tea. A top notch speaker may be rejected by a genuine music lover just because he can’t settle down with that baffle width.
- Some people simply will never be able to feel comfortable with an active speaker with a separate DSP appliance and multiple external amp channels. So, either incorporate all the electronics inside the speaker enclosure, or stick to passive.
- The superiority of a 3-way over a 2-way is more significant than that of an active crossover over a passive.
So the yama and niyama gave rise to the next generation of 3-way speaker designs, which split into two branches. One branch went for higher end drivers and active crossovers, and their pinnacle as of this writing are the Durga and the Shankara, closely followed by the Charukeshi Mark II. The other branch went the passive 3-way way, and tried addressing the question: how much improvement does one get if one sticks to the medium-grade drivers and components used in the Asawari IV and V, but just shifts the game to 3-way? The leader in this second line of exploration is the Adana.
The Adana incorporates all the things to avoid which emerged from the Darbari. It aims for a slimmer enclosure, works with just one amp channel per speaker, but keeps to the focus of this journey: do a 3-way. The Adana is followed very closely by the Adana Mark II, and the Charukeshi Mark III. (The Charukeshi Mark III does not avoid the first pitfall of the Darbari — it does not avoid the wide baffle and visually heavy appearance. It uses a 12″ woofer.)
Design notes
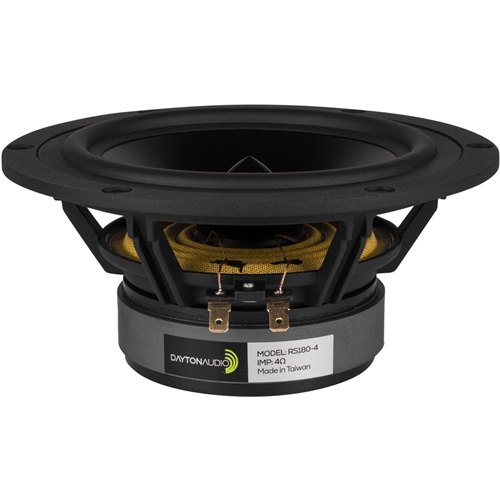
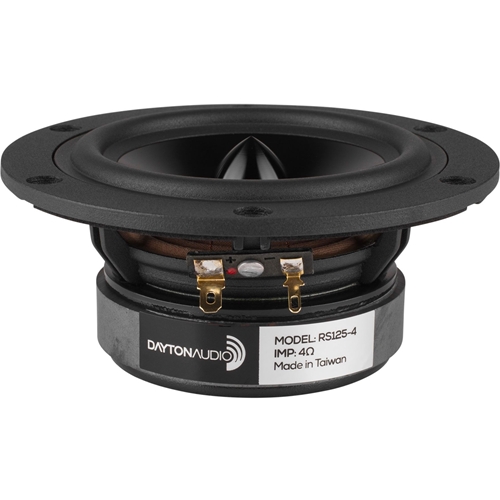
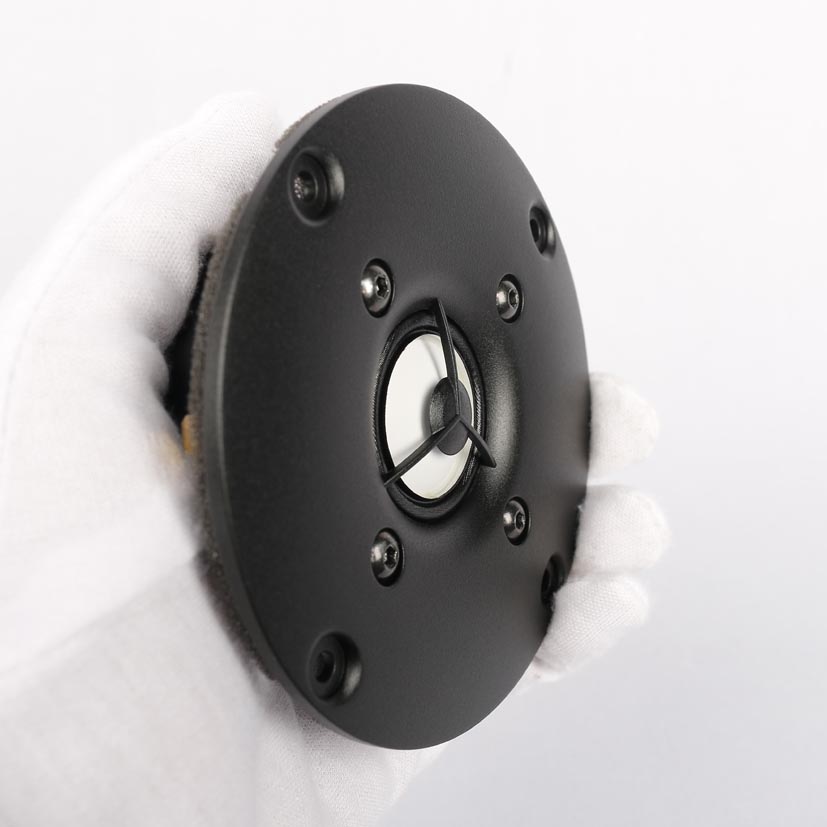
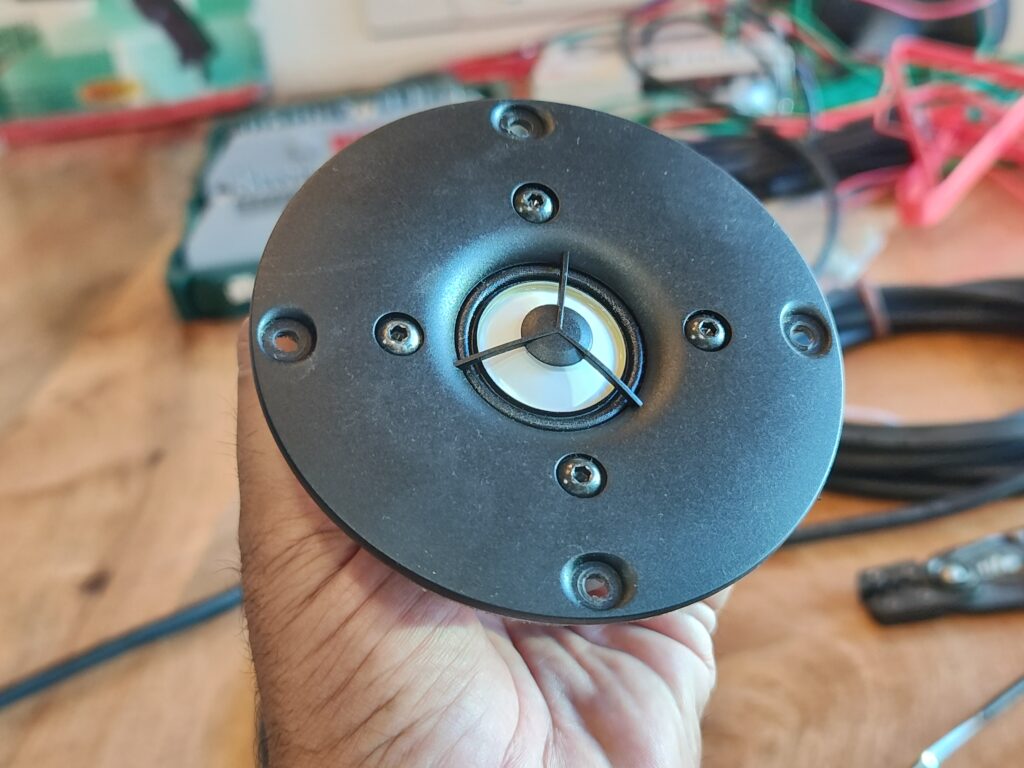
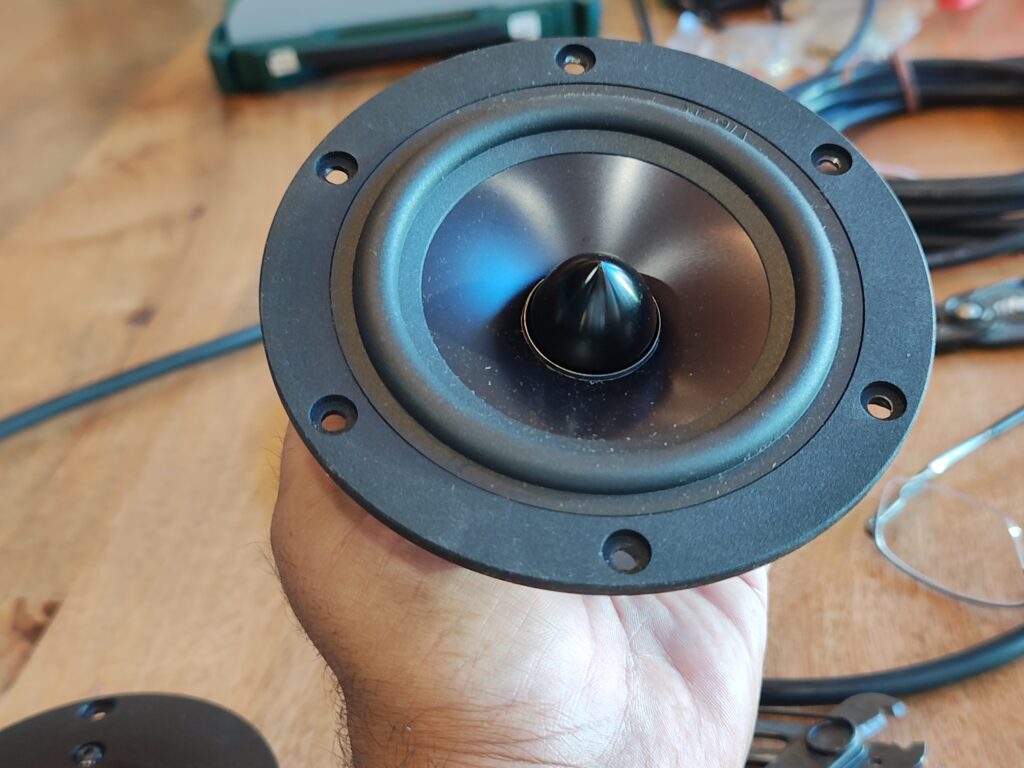
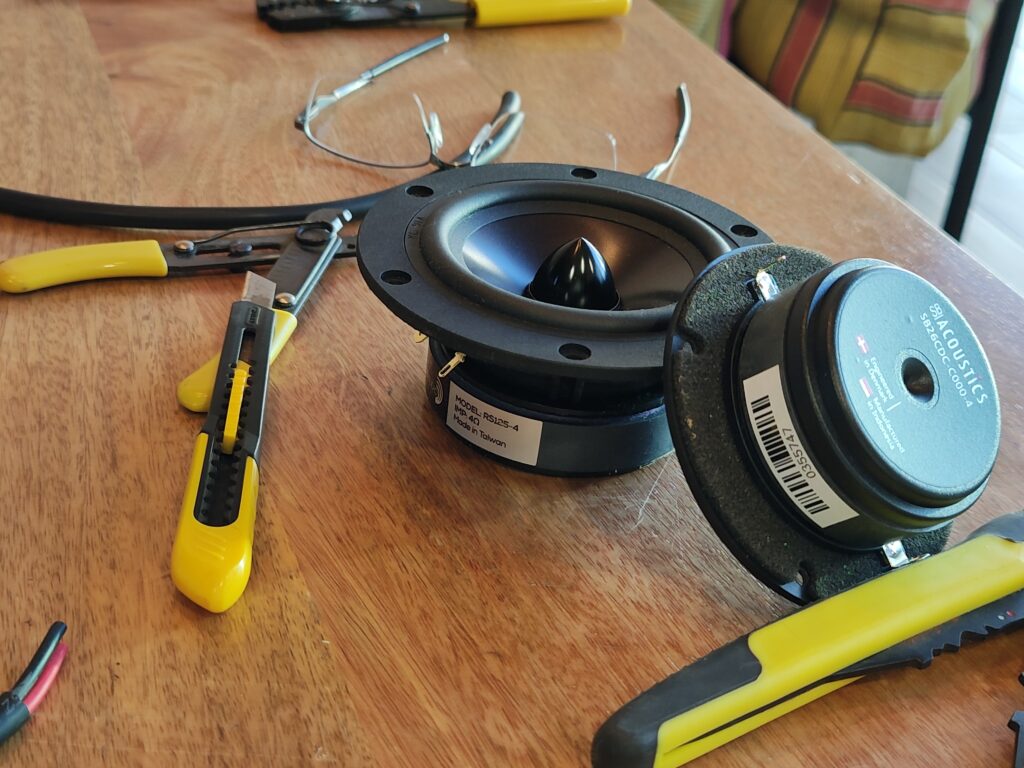
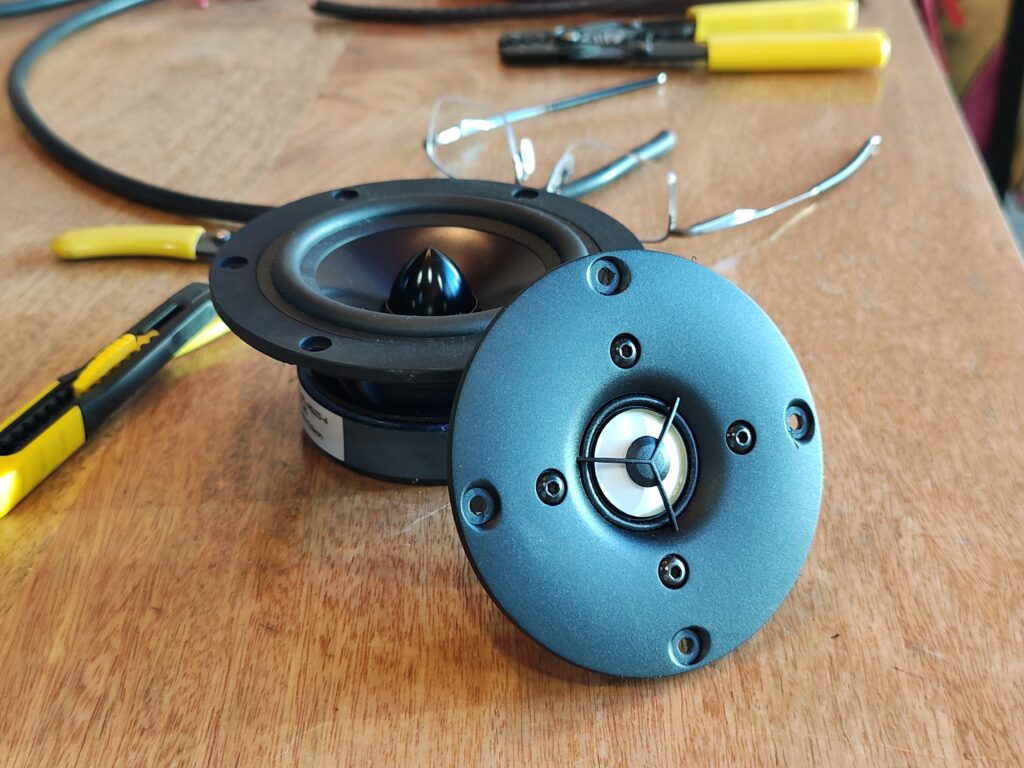
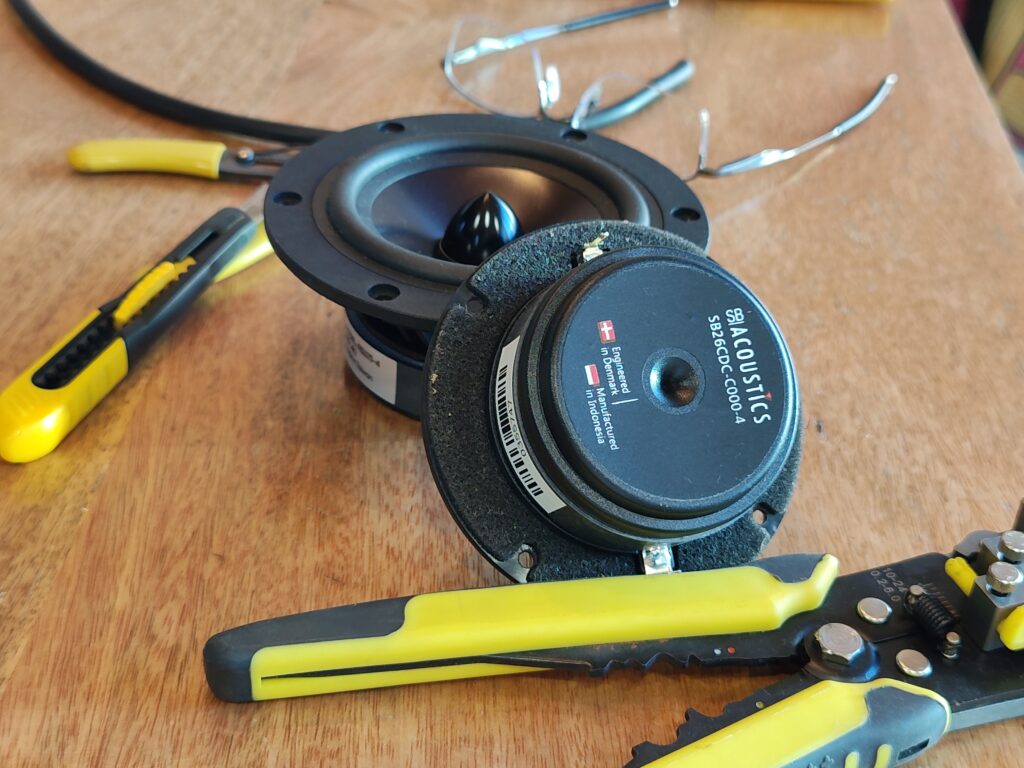
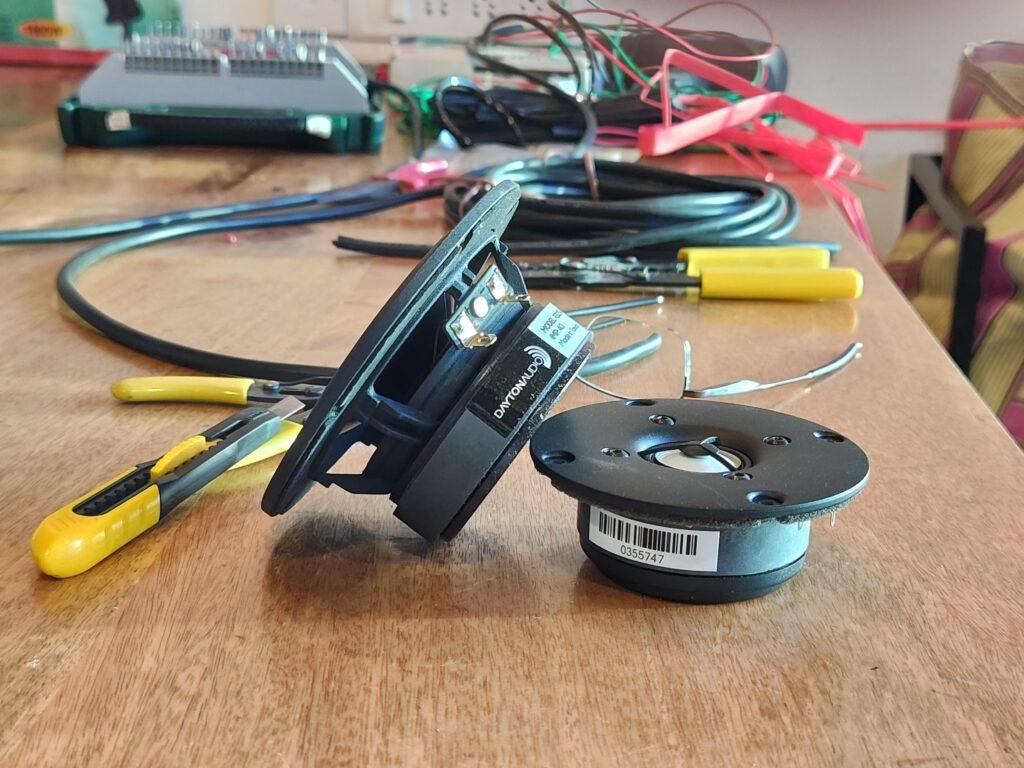
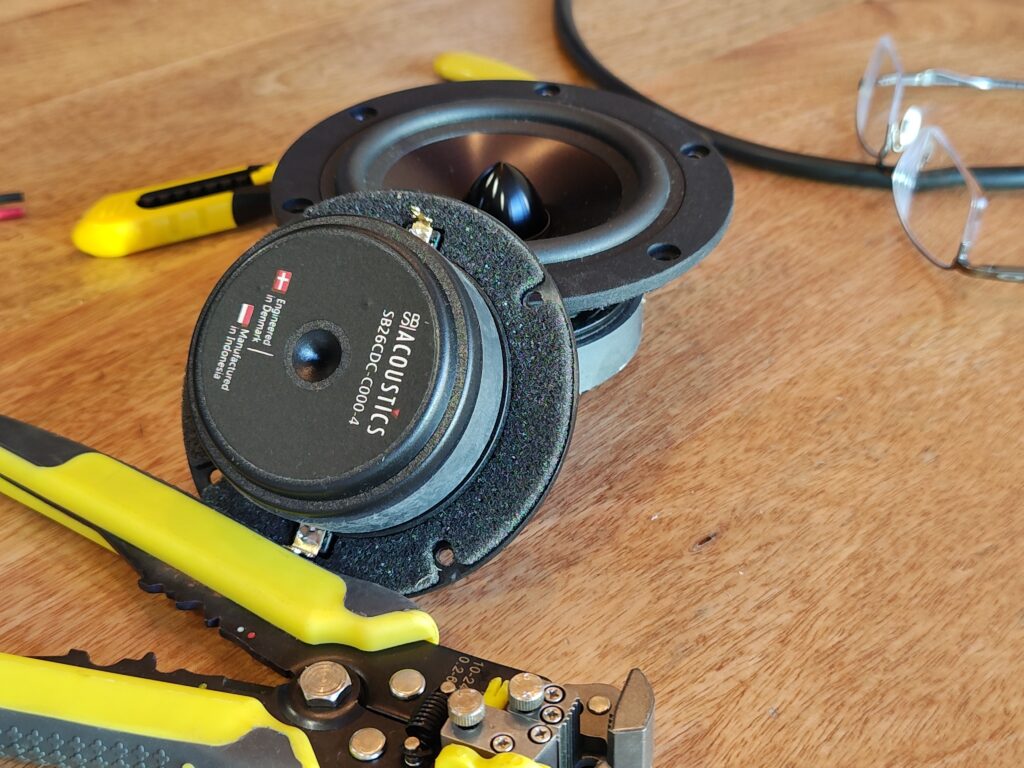
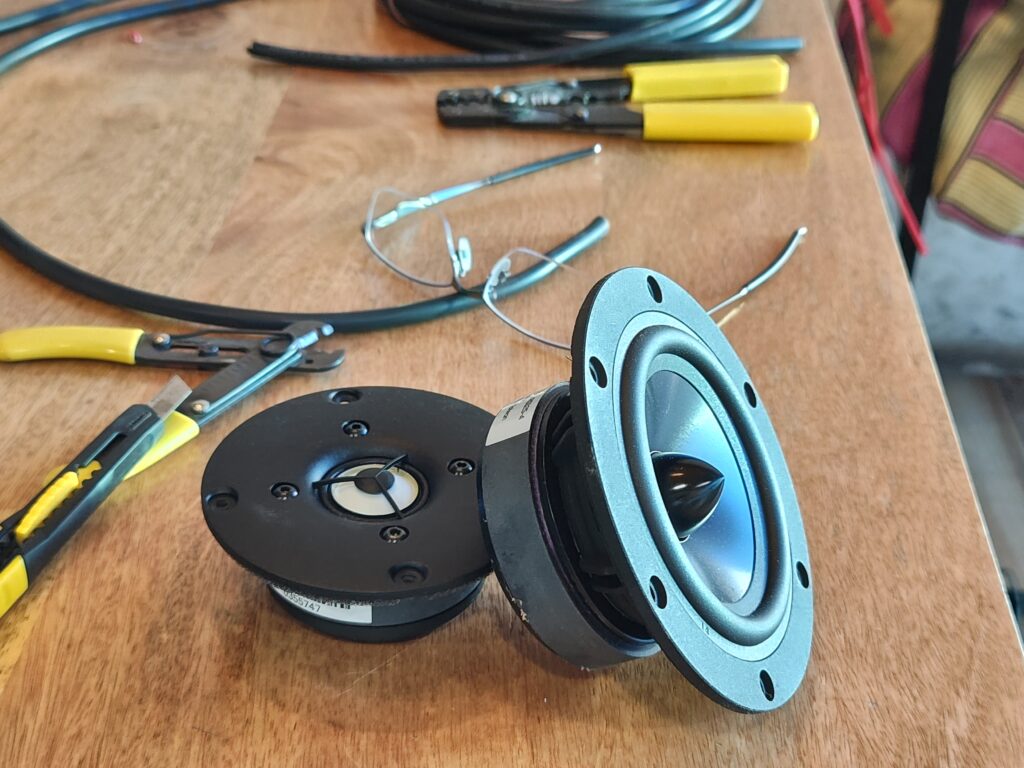
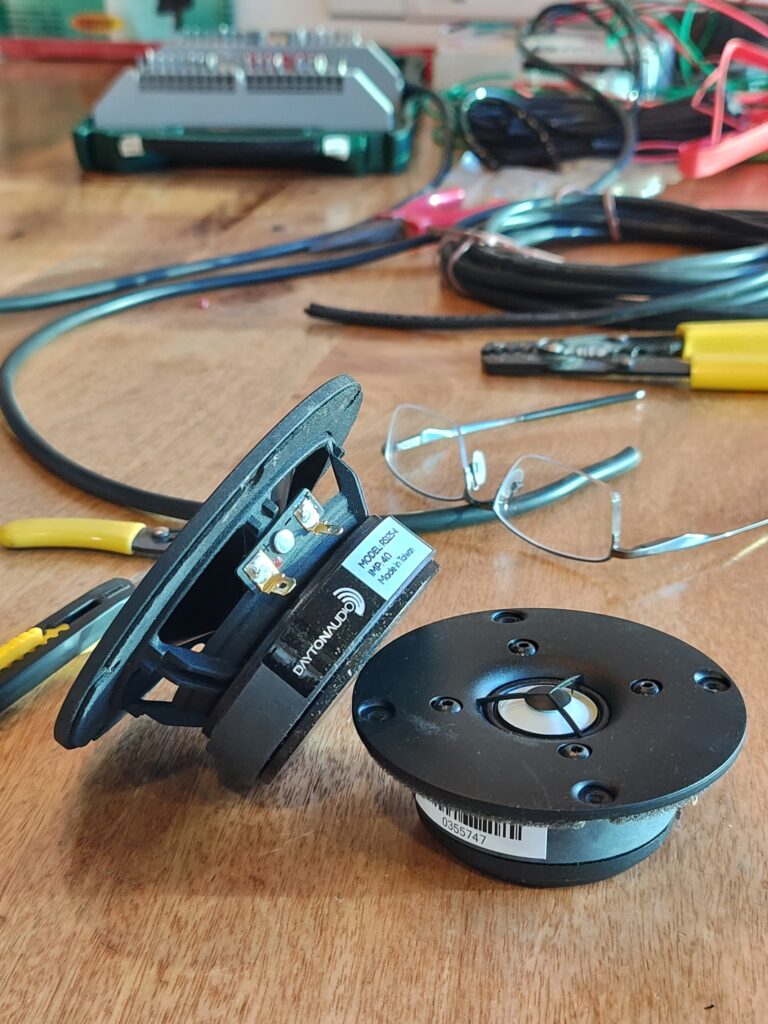
The Adana uses the same family of drivers as the Asawari Mark V, because we wanted to see how far the pure transition to 3-way would help if all else was kept unchanged. So, we have two Dayton RS180 8 Ohm metal cone drivers in parallel for woofer duty, a Dayton RS125 4 Ohm metal cone driver for a midrange, and an SB Acoustics SB26CDC tweeter for the upper octaves. It’s an all-metal symphony.
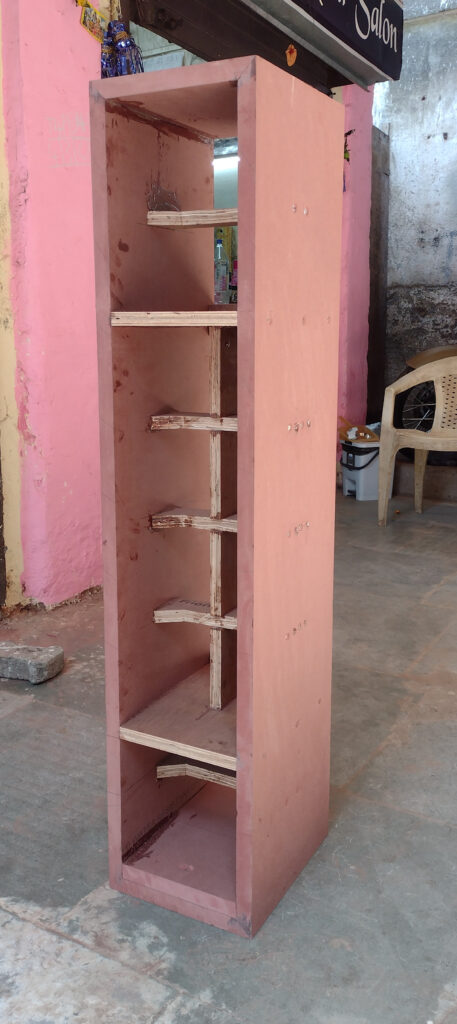
The woofers are in a common chamber with a bass reflex port. The RS line of woofers from Dayton are so similar to each other than it’s easy to mistake the RS180, 150 and 125 for each other.

The enclosure
Unibox gave me this when I specified a bass reflex box for two RS180-8 in parallel:
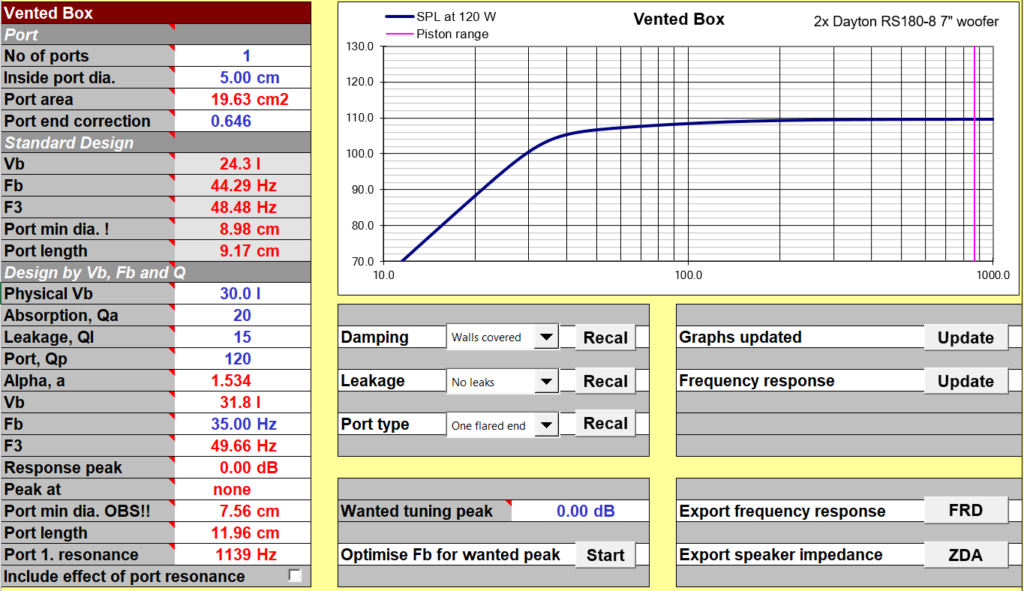
A 2-inch diameter port, 12cm long, would be the bass extension artefact. In-room bass extension would reach below 35Hz, covering pretty much all real music (home theatre LFE is not real music).
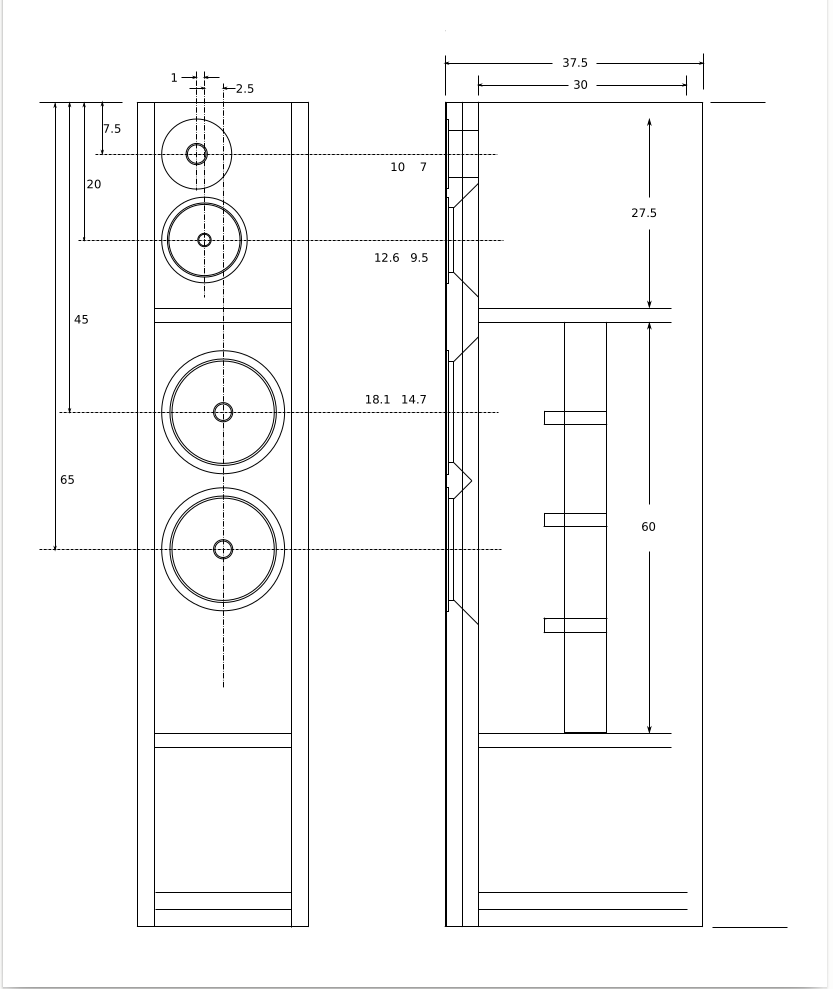
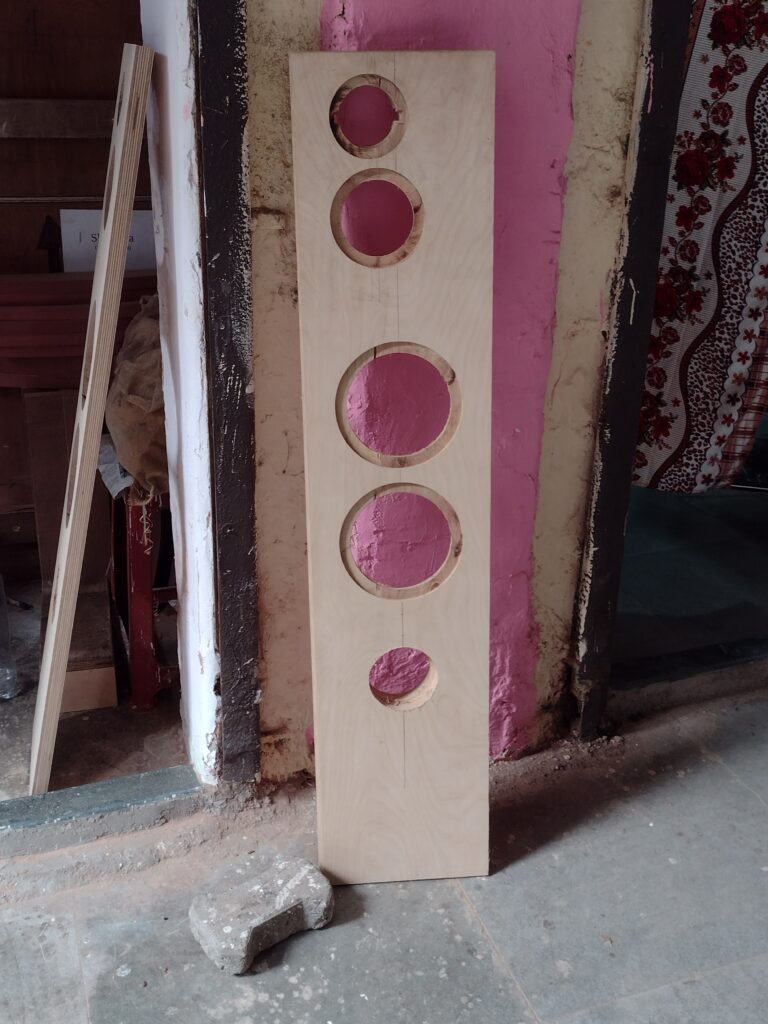
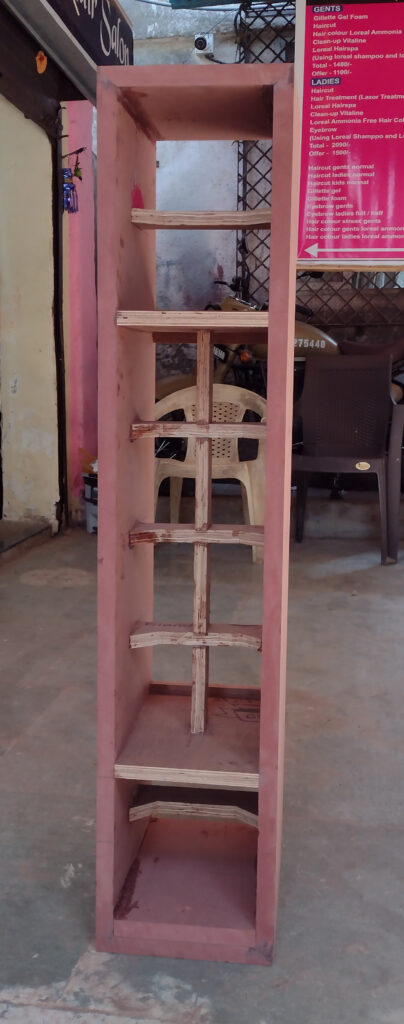
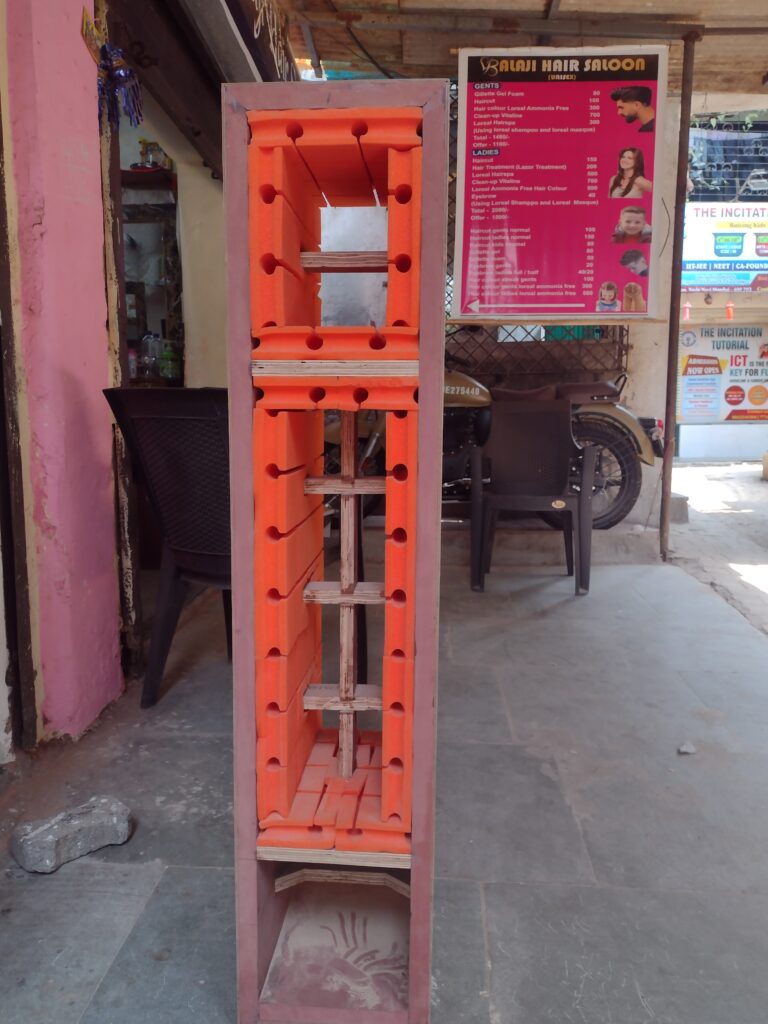
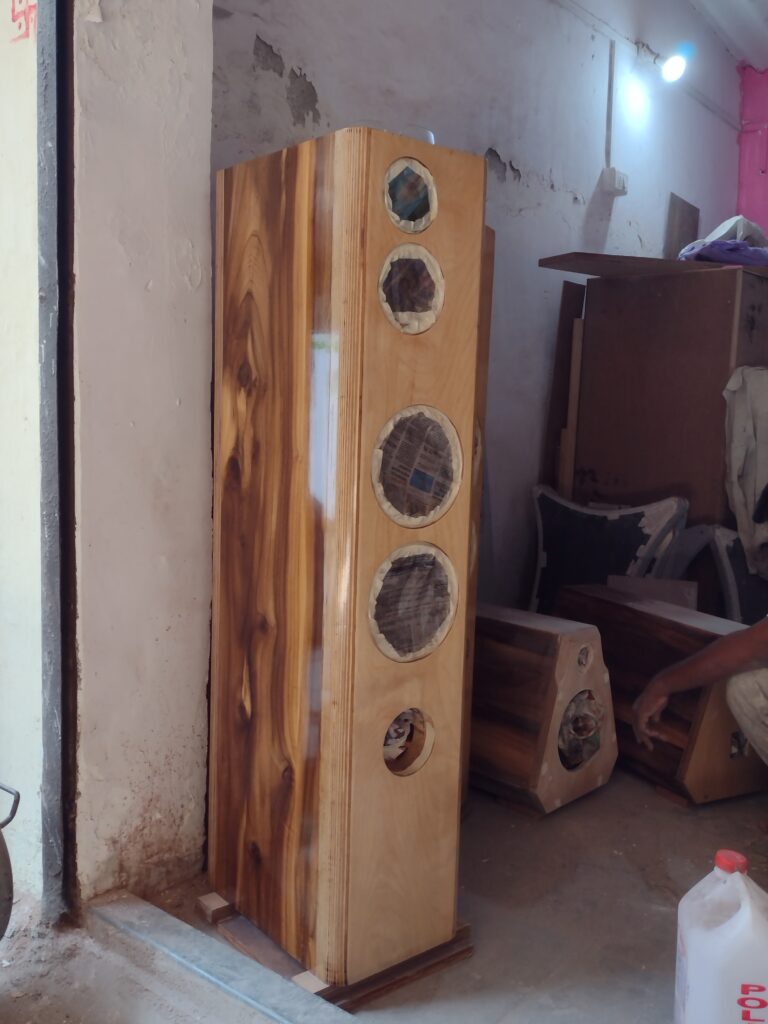
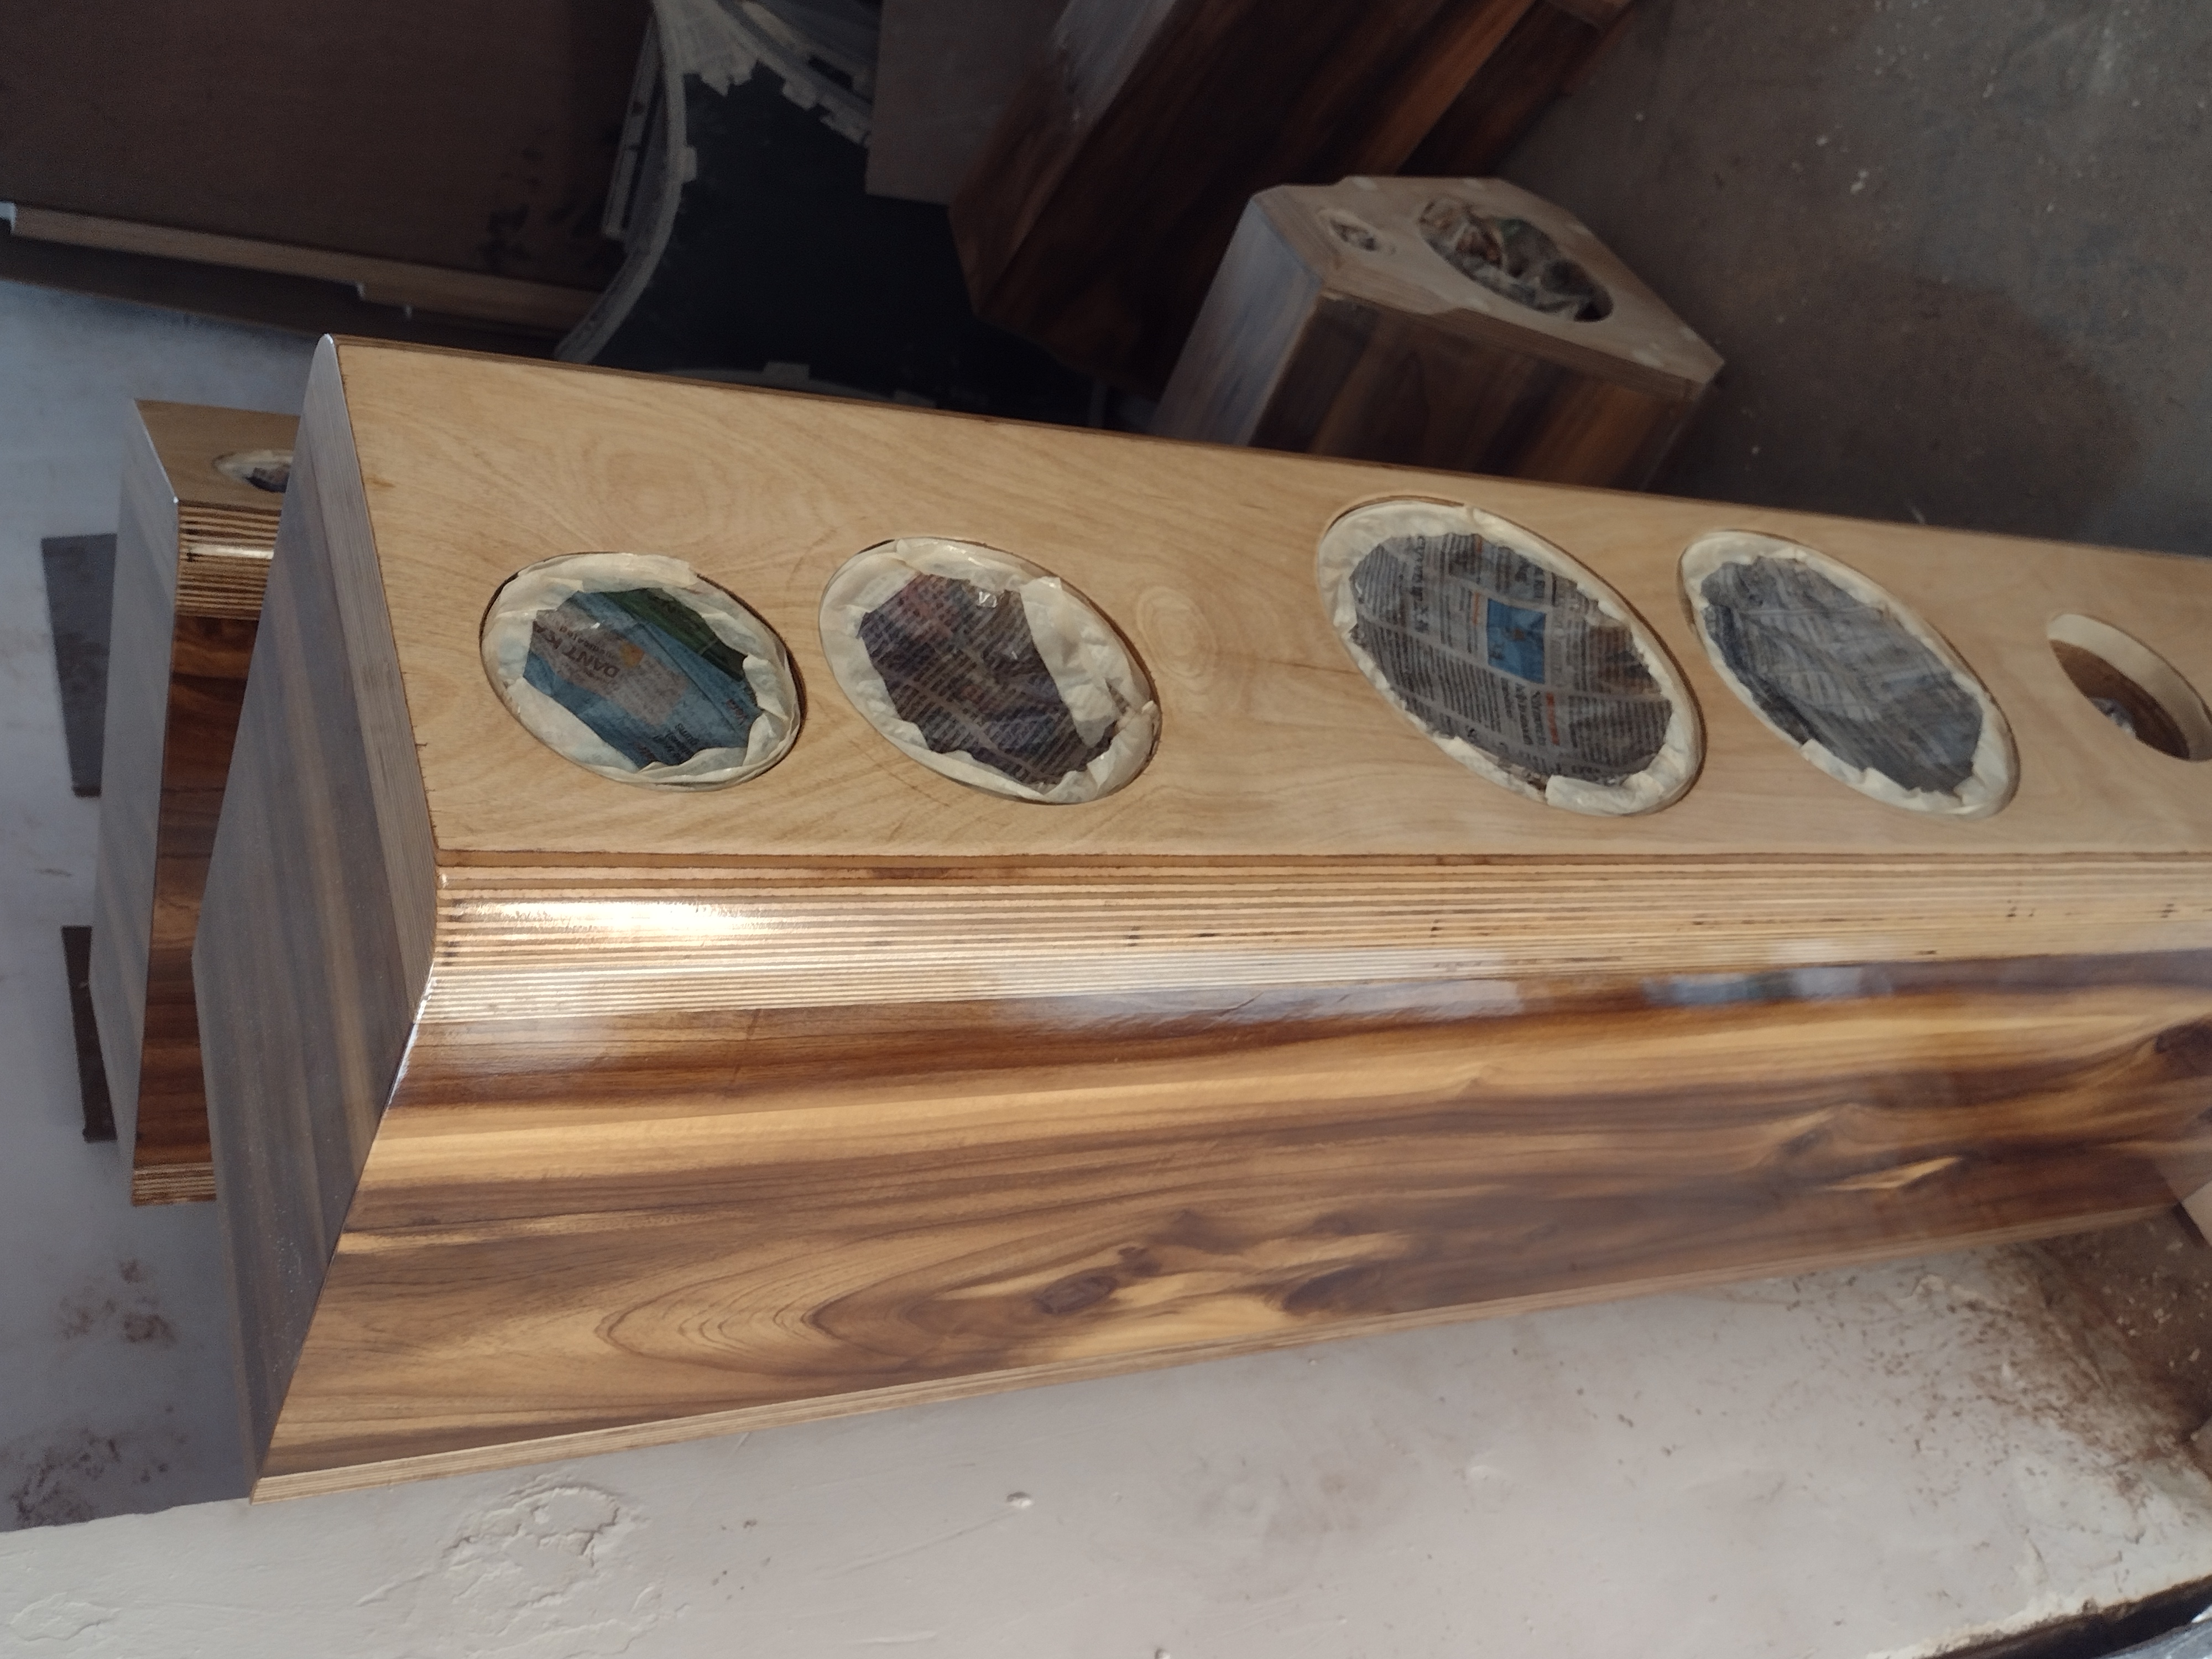
I designed the enclosure to be simple and non-controversial — a tall, slim box with a front baffle width as low as I could manage.

The construction is with my usual set of materials:
- 25mm marine grade high density fibreboard (HDF) for all sidewalls, top and bottom
- 25mm Baltic birch for front and rear baffles
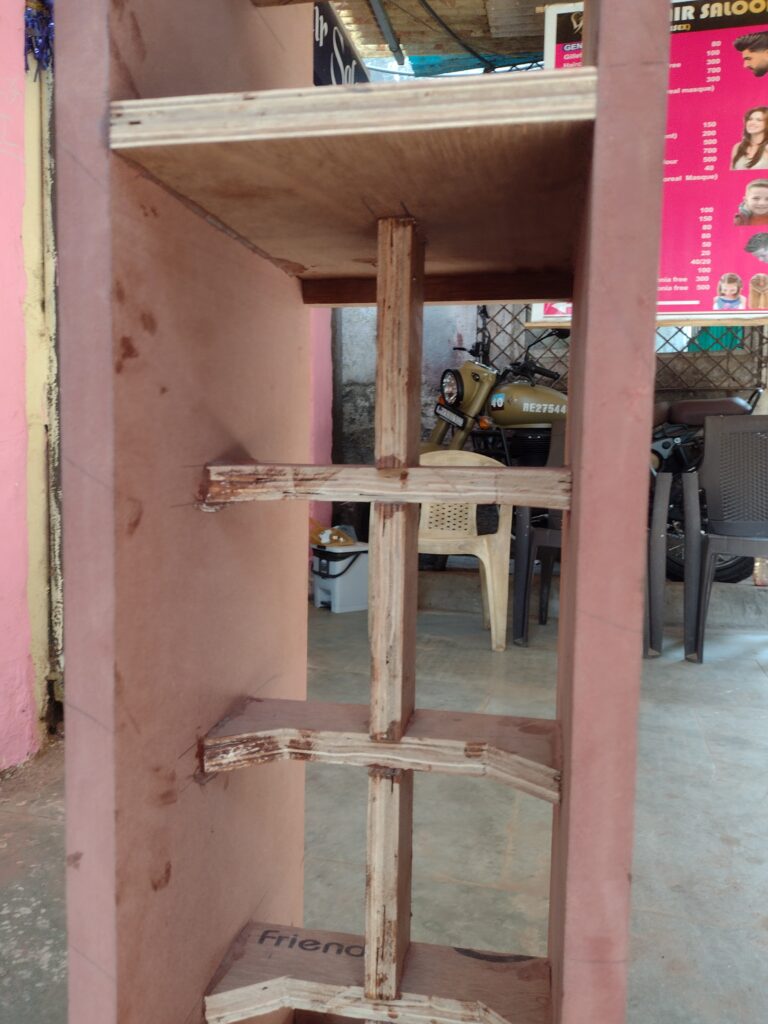
- 18-20mm commercial ply for internal bracing, partitions, etc
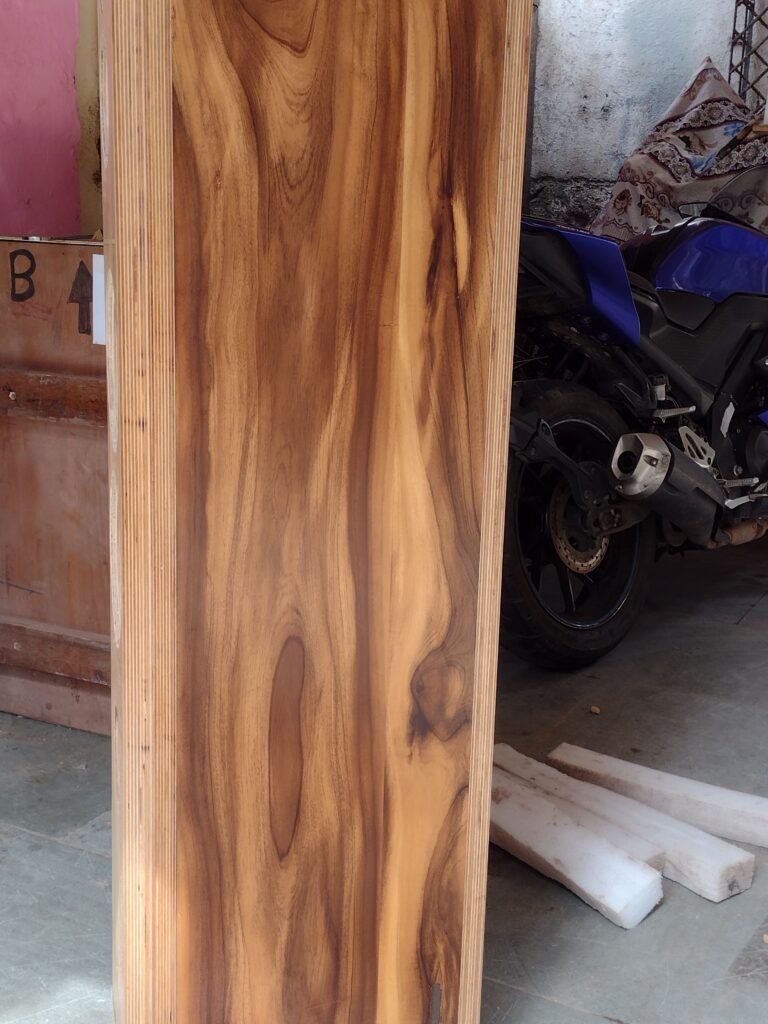
- Real-wood veneer covering of top and sides. These veneer sheets in India are 4mm thick, like thin sheets of plywood.
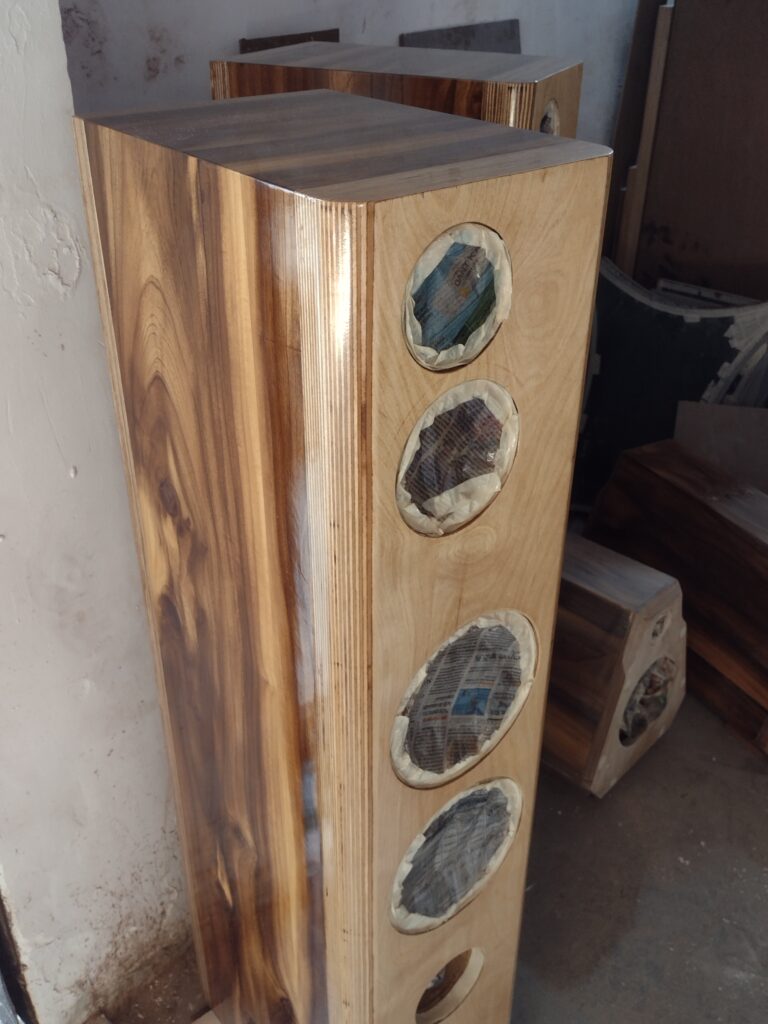
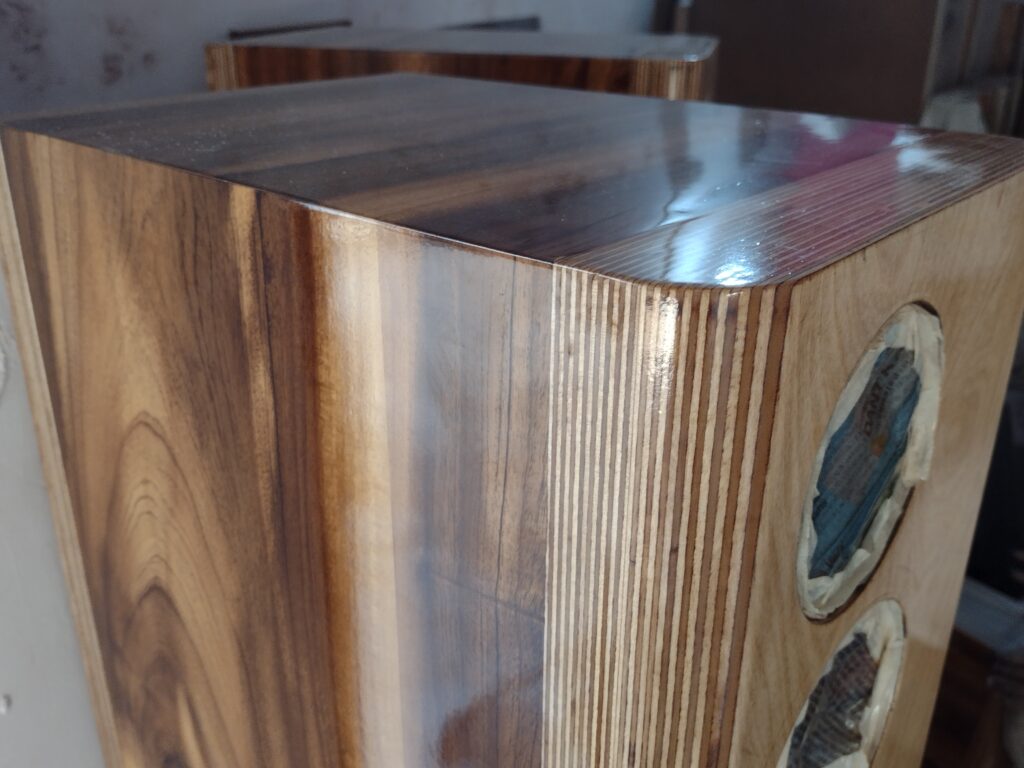
The drawings show 25mm radius roundover of the vertical edges of the front baffle. In reality, I went with 37mm (1.5″) radius roundover, and it turned out awesome.
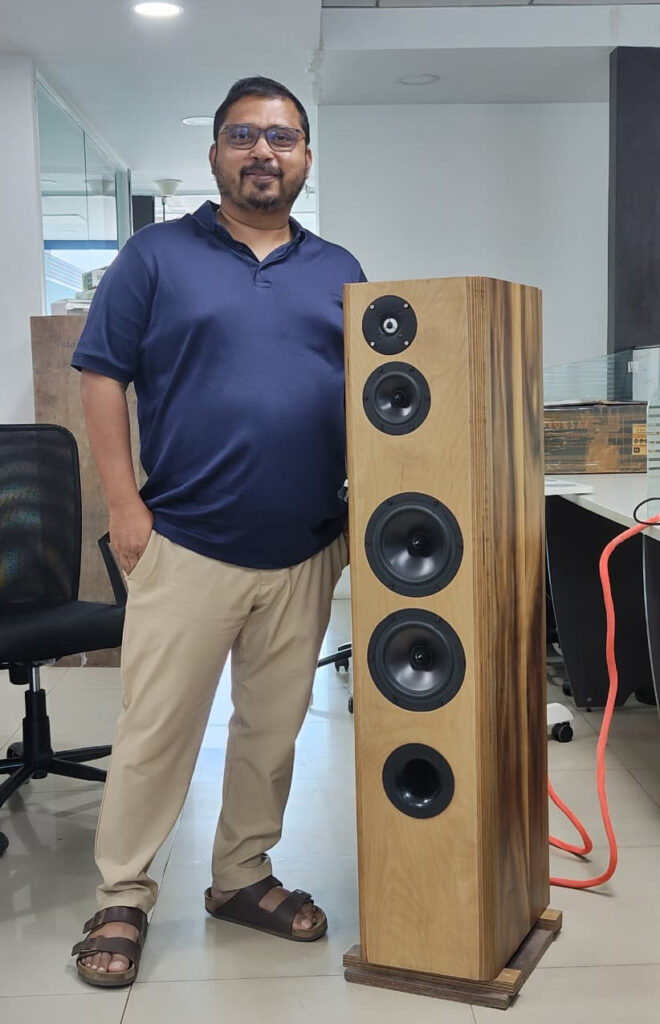
From the front, the enclosure looks slim and elegant.
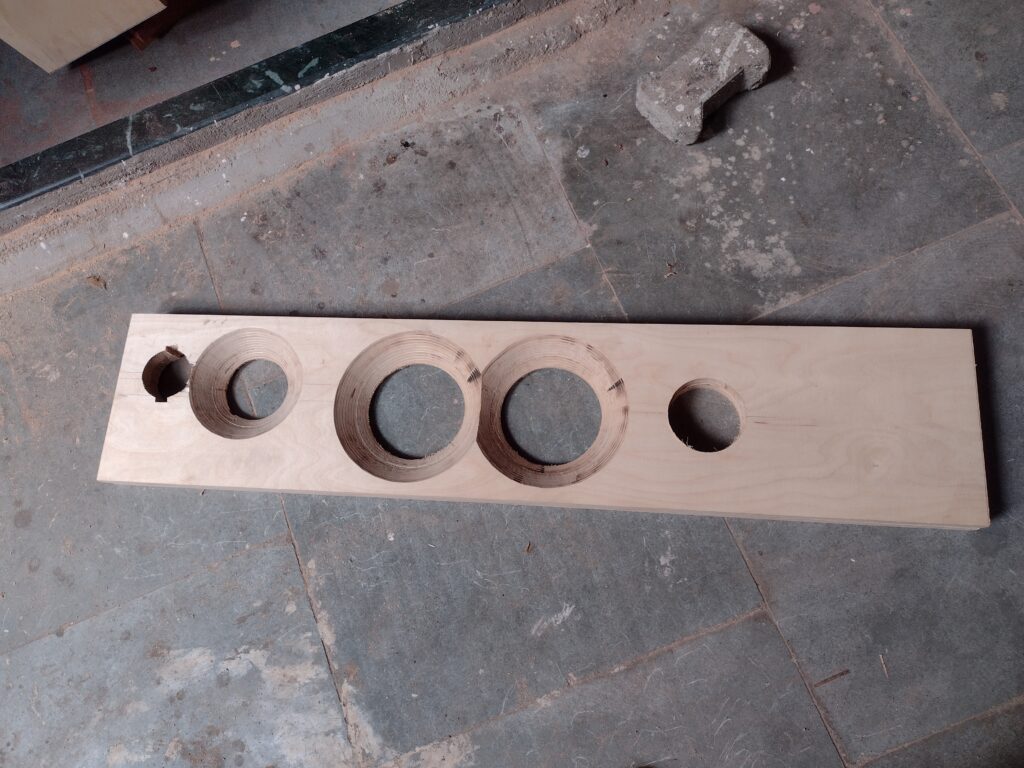
Inside, there is an unused chamber at the bottom which is not used for anything.
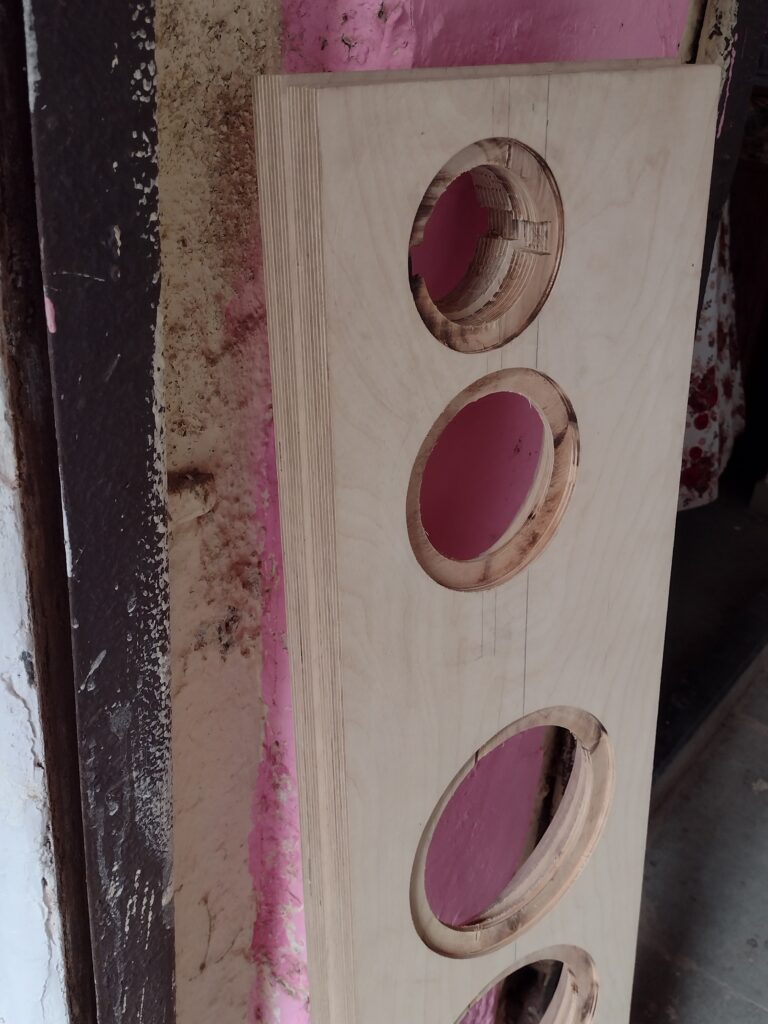
The midrange and tweeter are offset to one side on the front baffle, partly to make the edge diffractions asymmetric, partly because they look cute that way.
We start by cutting the parts and putting them together. The bracing, sidewalls, and top and bottom get fitted first. All fitting is done using Araldite and wood screws. It’s always both for my builds. After the first 24 hours, the wood screws play no role in the structural strength and rigidity, but till the Araldite sets, they are vital to hold the pieces in place while the assemblies are moved around.

The video below shows a sidewall being fitted to the bracing structure. Araldite and wood screws are being used. Each screw is first dipped in Araldite and then inserted into the pre-drilled hole and tightened. This ensures that the screw never weakens or splits the plywood from which the bracing is made. After 24 hours, the ply and wood screw becomes one solid unit and will last a hundred years.
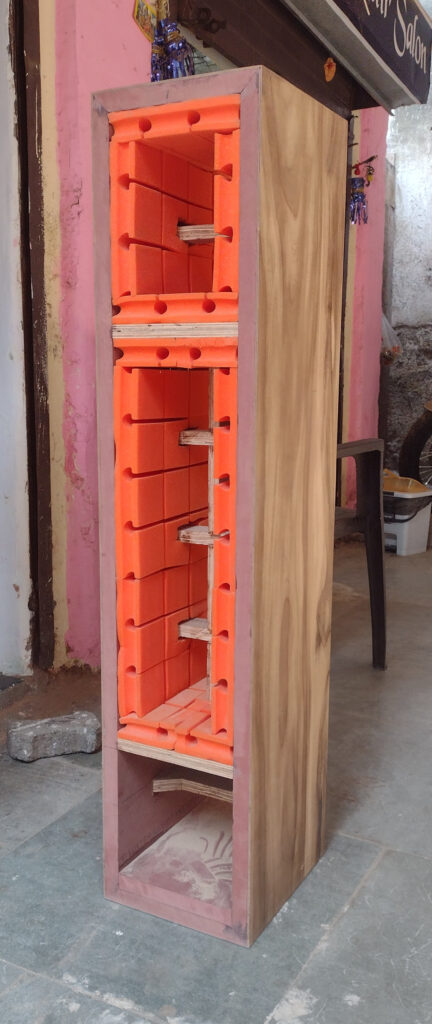
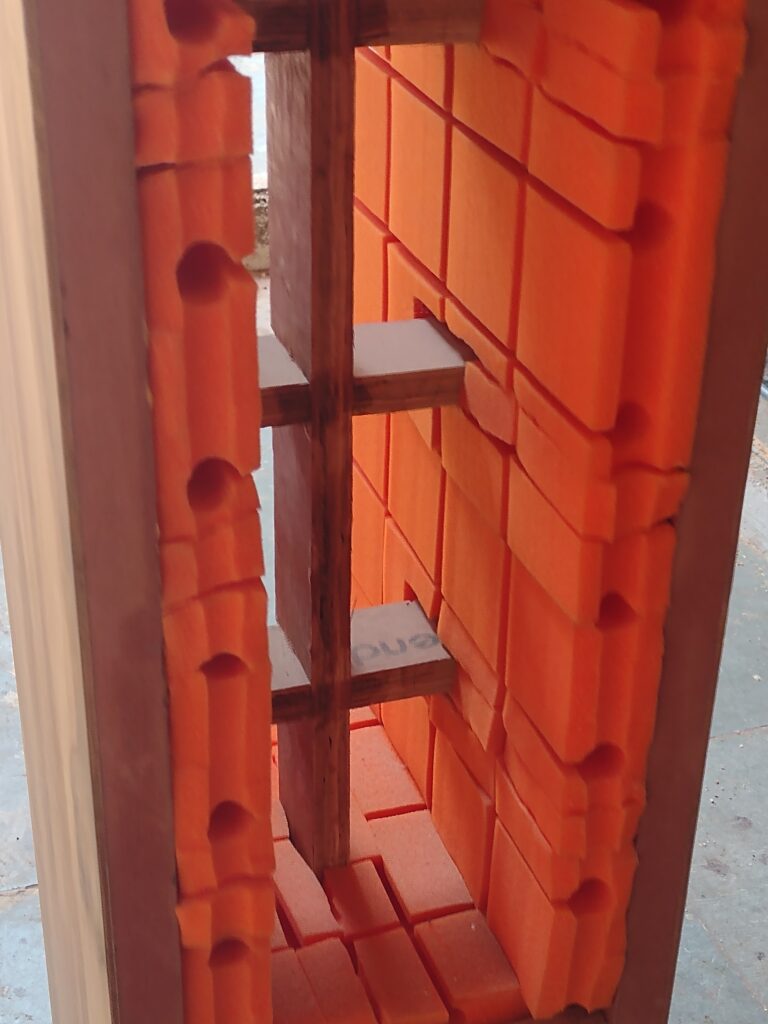
We then fitted the absorbent lining. Past projects have taught us that it’s a pain to fit it after the enclosure has been completed and sealed up. At this stage, the front and back plates are still open.
The veneer is also stuck on the top and sides at this stage.
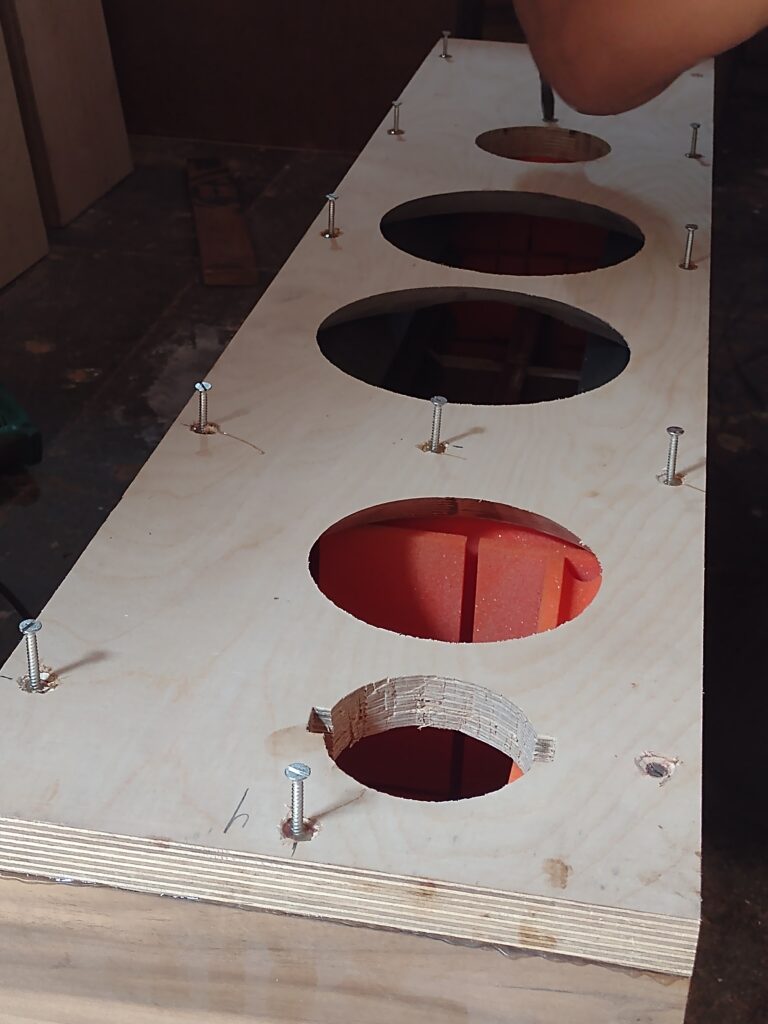
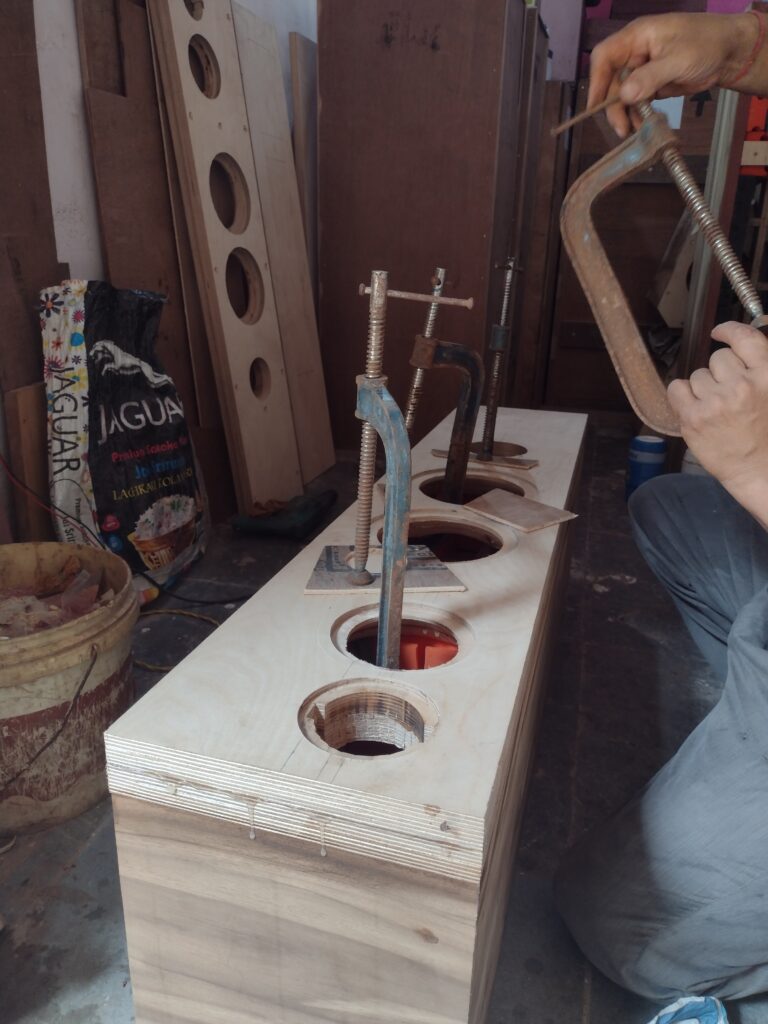
After this, we fit the front and rear baffles. The rear baffle is removable and is simple — it will always be fitted with a dozen screws and can be removed for crossover maintenance. (Not that crossovers need maintenance.) But the front baffle is a bigger job. This is made of two sheets. The inner sheet is fitted using Araldite and wood screws. The outer sheet is then stuck on purely with clamps and Araldite, no screws at all. Screws which reach the outer surface of the enclosure can never be effectively hidden by the final touch-up and polishing, so the outer surface never has screws.
The videos below show how the front baffles are being fitted. First, fit the inner sheet of the baffle.
Note how each screw’s threads are first dipped in Araldite and then inserted into the pre-drilled hole and tightened.
After the inner baffle sheet, the outer baffle sheet is clamped down with just Araldite and G clamps
The next step is the roundover of the vertical edges of the front baffle with a 1.5″ radius roundover bit, followed by five days of hard labour for the PU polish. Epoxy, sealant, then more sealant, then more sealant, and finally, the top coat, transparent matte finish PU.
Measurements
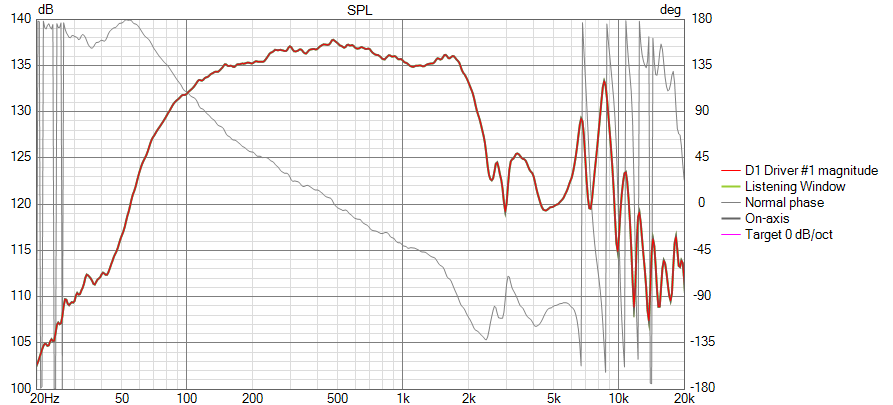
The tweeter
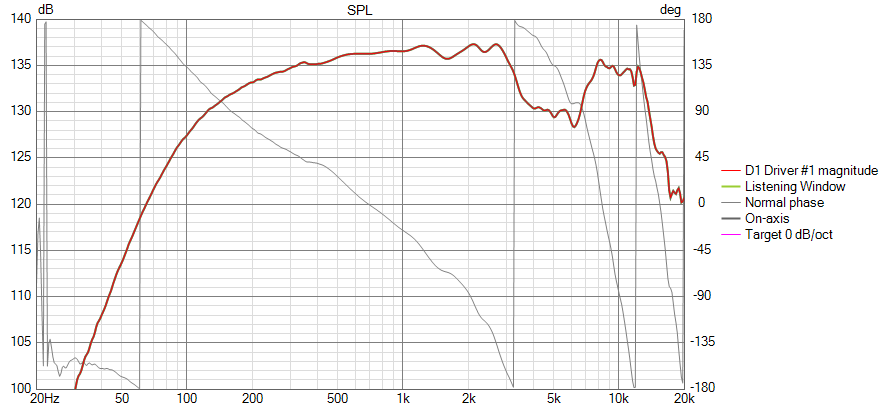
I did a gated SPL measurement of the tweeter, periodic-noise, 1 metre.
This was disturbing, because I was getting a dip at 3.5K and a peak at 5K which were not there in the manufacturer’s datasheets:
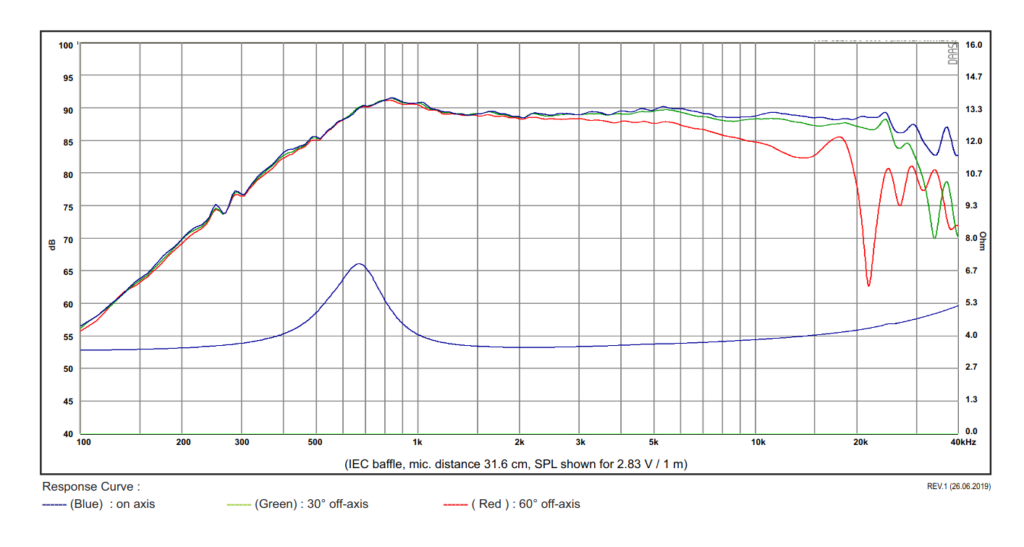
Anyway, I chose to work with my own measured data.
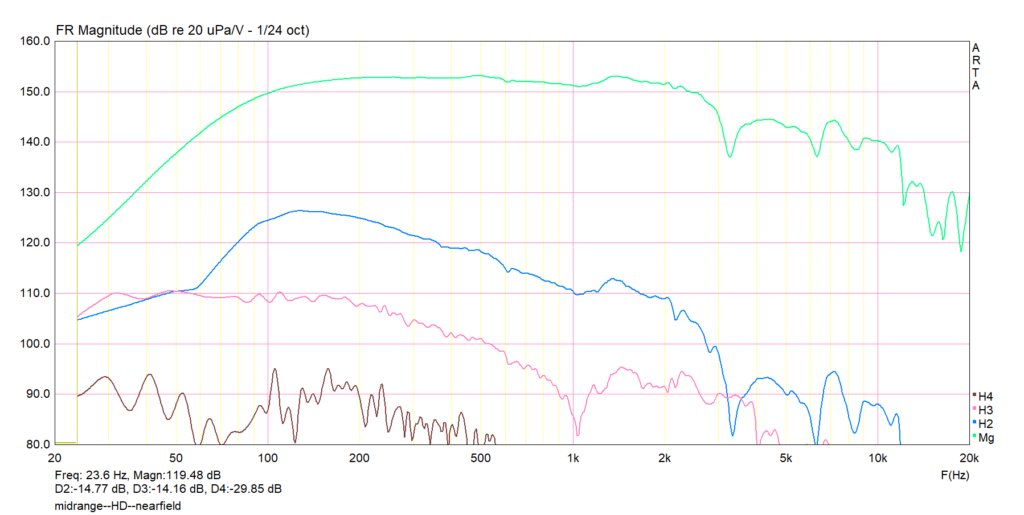
The midrange
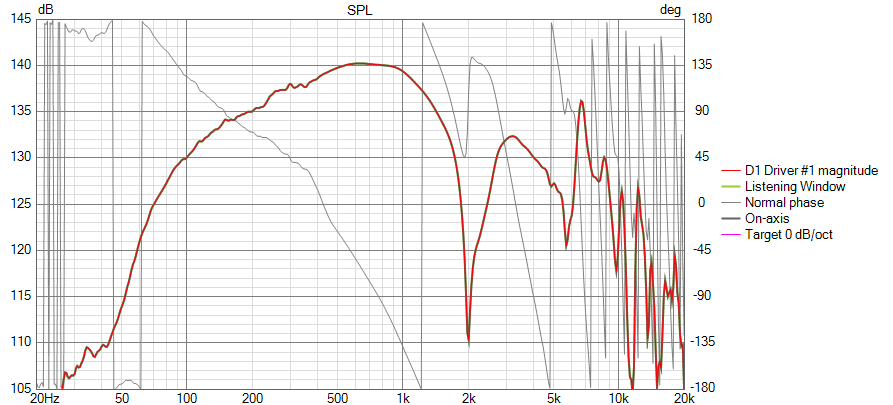
Took a gated farfield of the midrange, first on the midrange axis, then on the tweeter axis, 1 metre
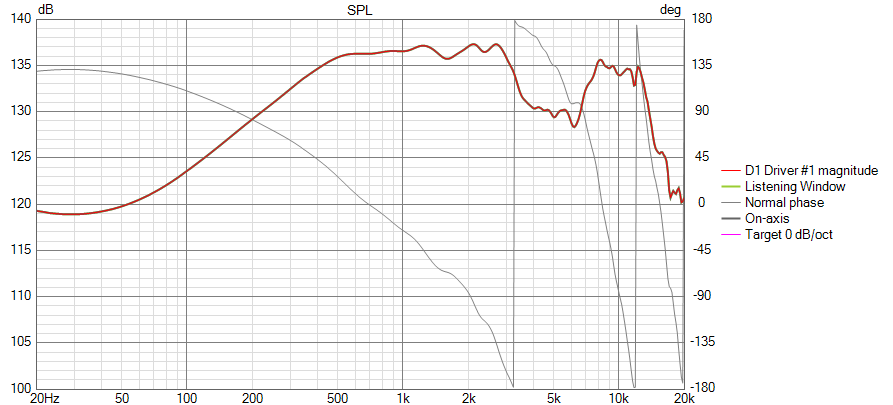
Then I did a nearfield an inch from the driver cone:
Then merged the two in VituixCAD to get a single composite SPL plot, which I later used for crossover design:
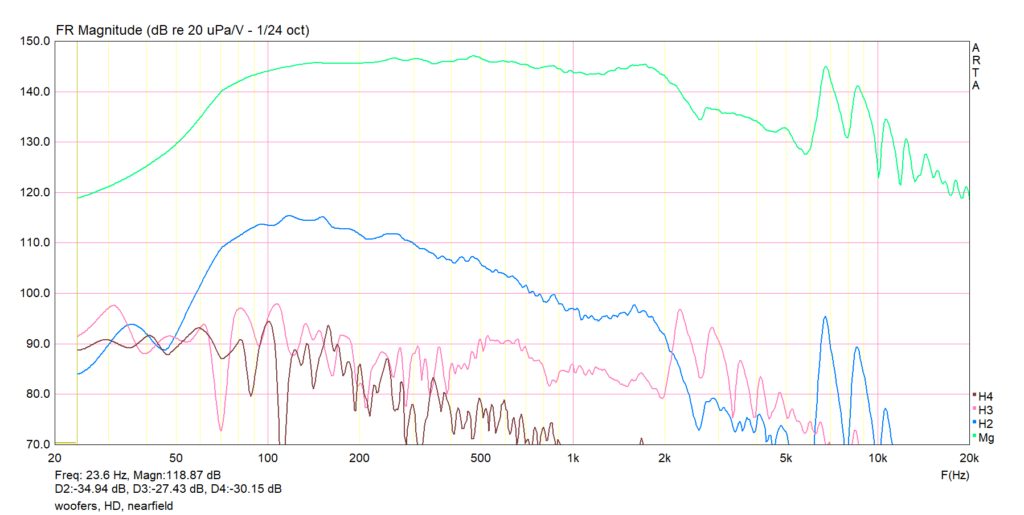
The woofers
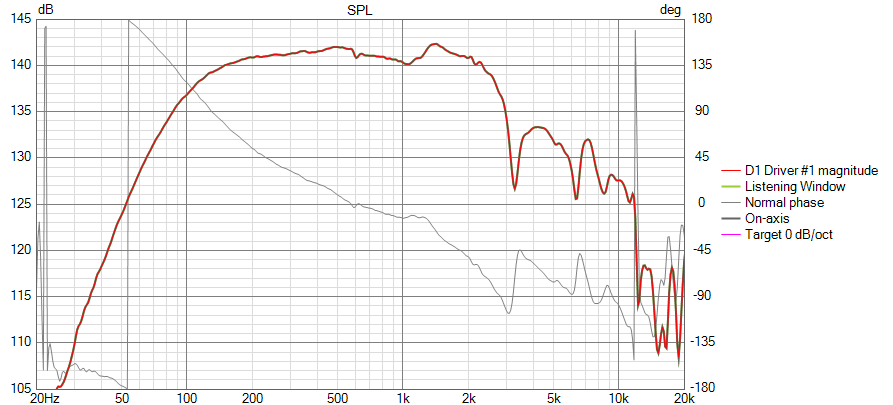
Did a gated farfield measurement of the woofers, on the tweeter axis, at a distance of 1 metre from the front baffle. This measurement is not expected to be of any use, because the reading does not have any valid data below about 500Hz, and the only part which is supposed to be useful for crossover design is below this.
Then I did a nearfield measurement, off one of the woofers:
And then I merged the nearfield and farfield:
Other measurements
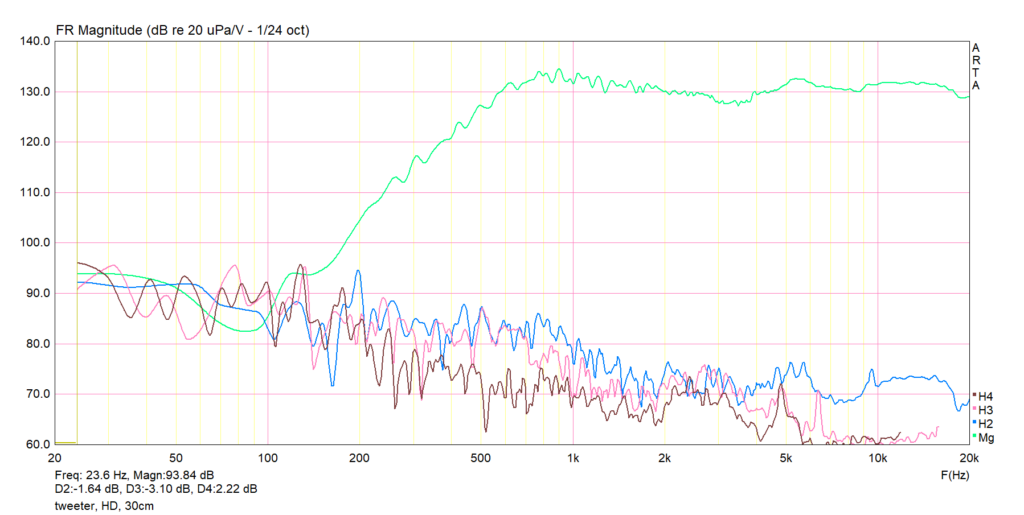
Tweeter harmonic distortion, 30cm from the baffle:
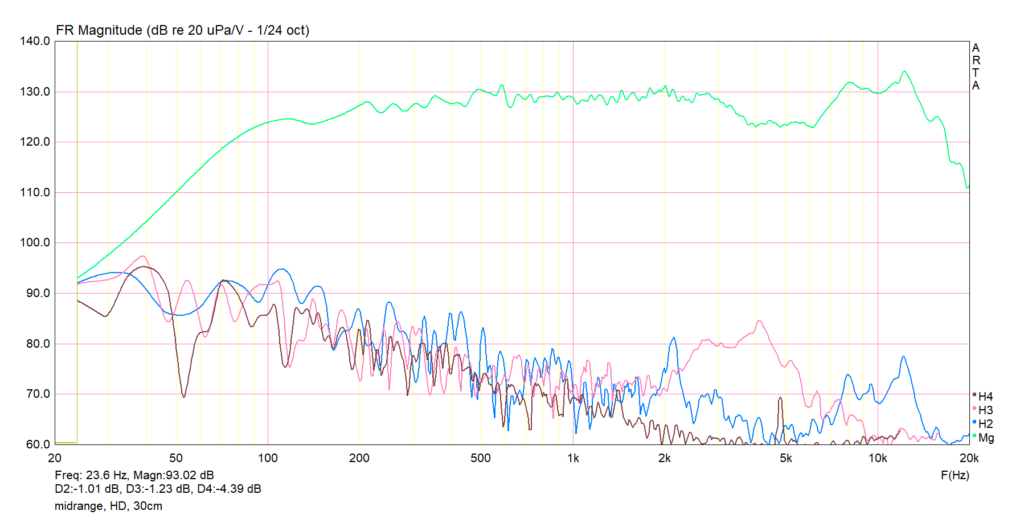
Midrange harmonic distortion, first at 30 cm distance, for the higher frequencies, then nearfield, for the lower frequencies:
Woofer harmonic distortion, nearfield, to show low frequency behaviour.
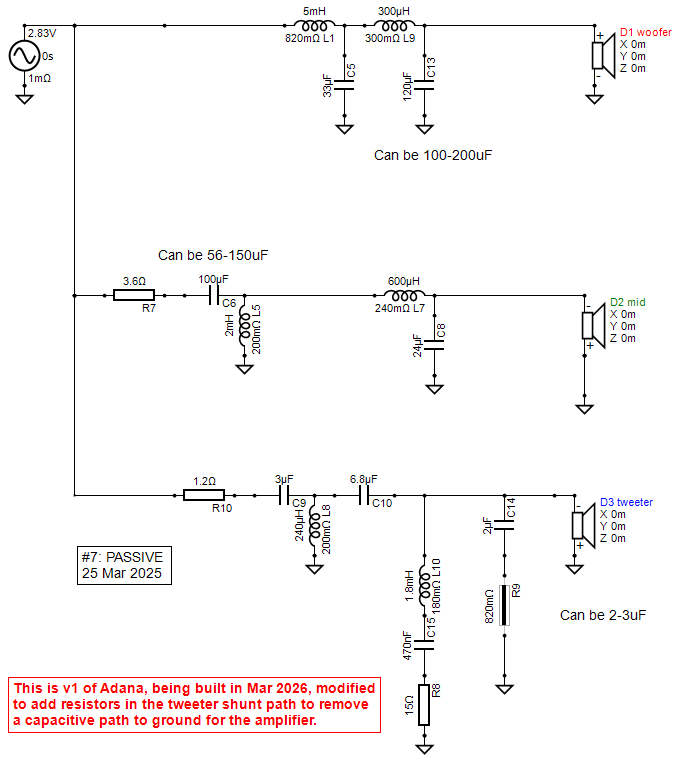
The crossover
I started plugging the various SPL and impedance data files into VituixCAD, and after several months of part-time fiddling and experimentation, I arrived at this crossover:
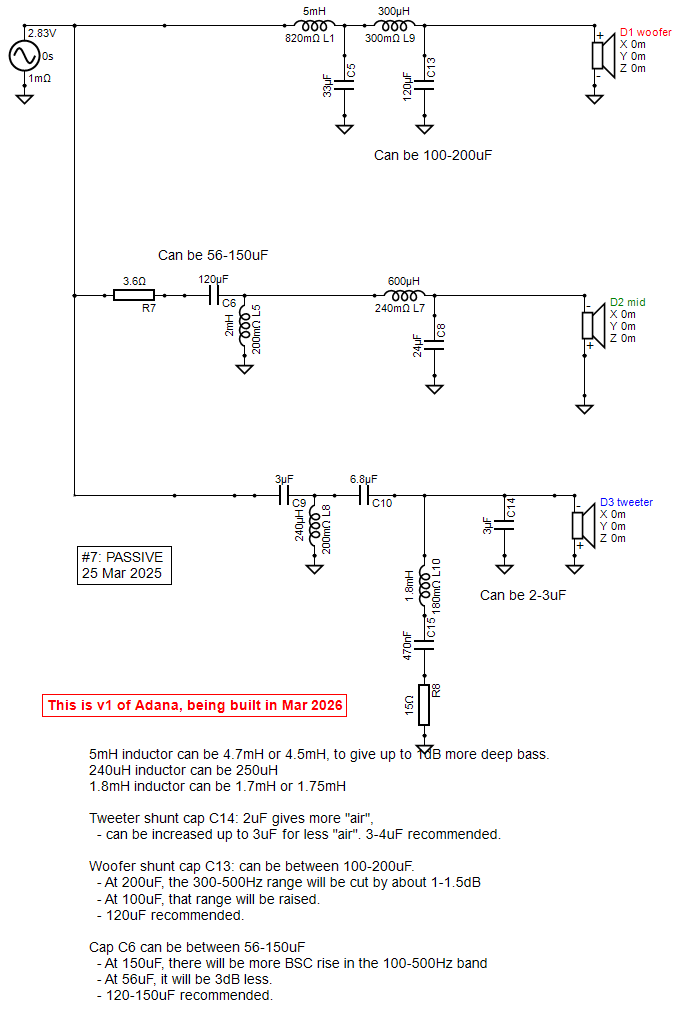
The circuit shows one woofer, but that woofer represents two physical woofers in parallel.
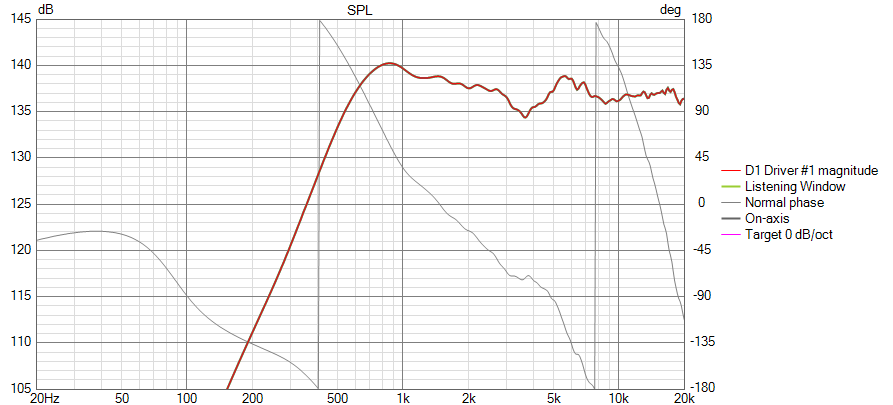
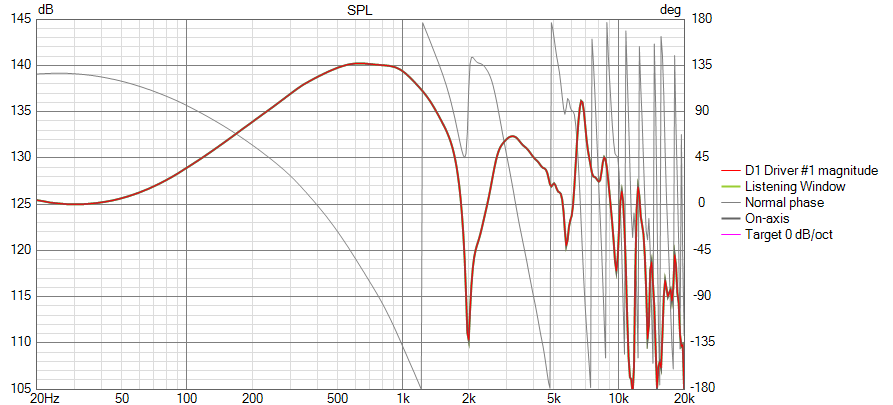
The on-axis SPL of this crossover turns out to be:
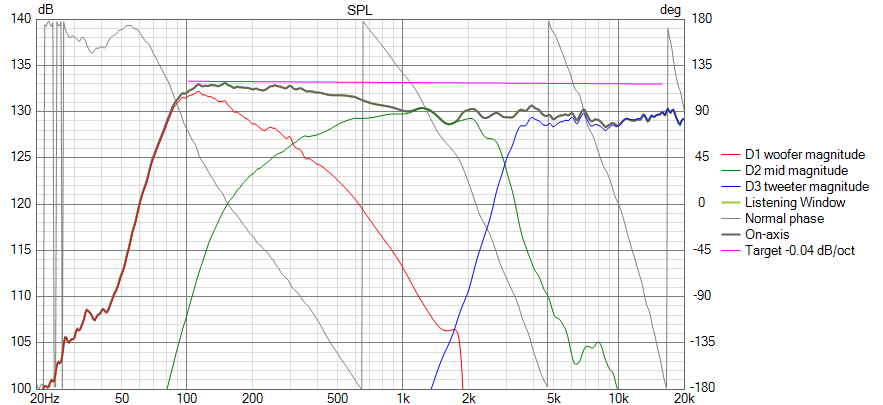
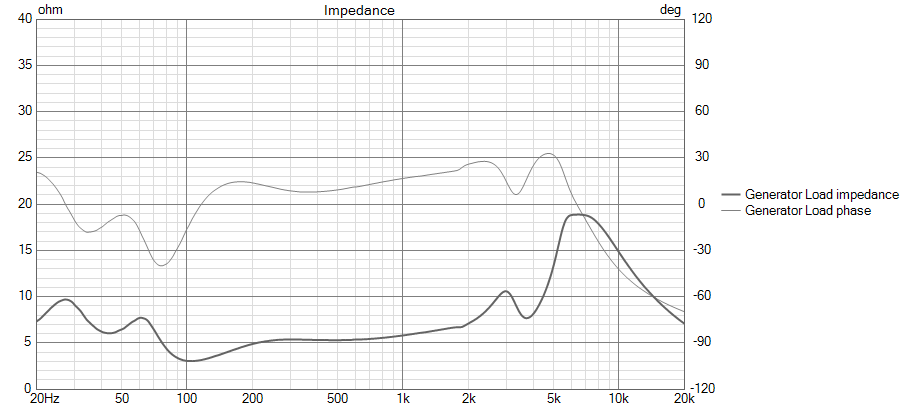
The crossover frequencies have fallen almost exactly at 300Hz and 3KHz.
The impedance of the speaker is shown here. As you can see, it’s a lowish impedance load, so it’ll need a relatively powerful amp to drive the bass frequencies well.
I assembled the crossover on the two boards which have been provisioned for this on the rear panel of the speaker.
Shown below are the two crossover boards for one Adana enclosure. I used the smaller board for just the tweeter crossover. The woofer and midrange circuits are on the larger board. Each board has a ground-common terminal strip, and a separate terminal strip for off-board wires.
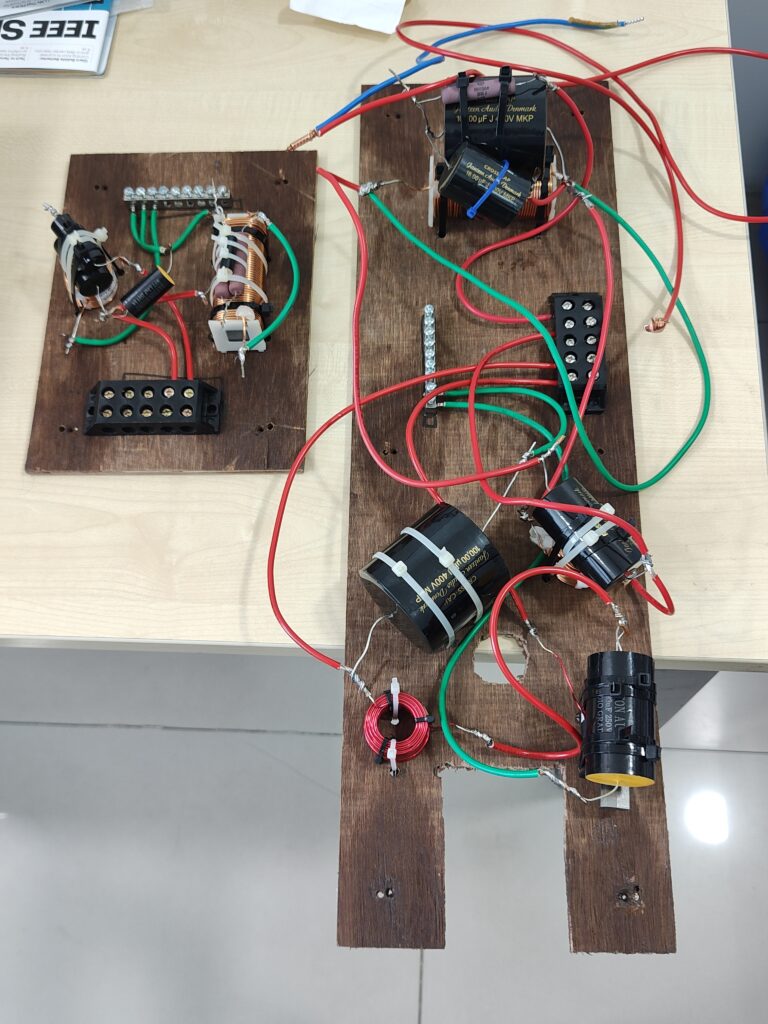
I had never assembled this complex a crossover before, and I had also not used such high value inductors and capacitors before. There is a 5mH inductor and two 100uF capacitors on each board. Not surprising, considering that this is the first crossover which has a Fc as low as 300Hz. Two-way crossovers are far simpler, and of course they have smaller component values, because of the higher Fc.
The photo below shows the rear baffle board of one enclosure with its two crossover boards mounted in their final positions, pending final hookup. This final hookup includes connecting the binding posts to the input terminals of the crossover and connecting the drivers to the output terminals, plus a few inter-board wires.
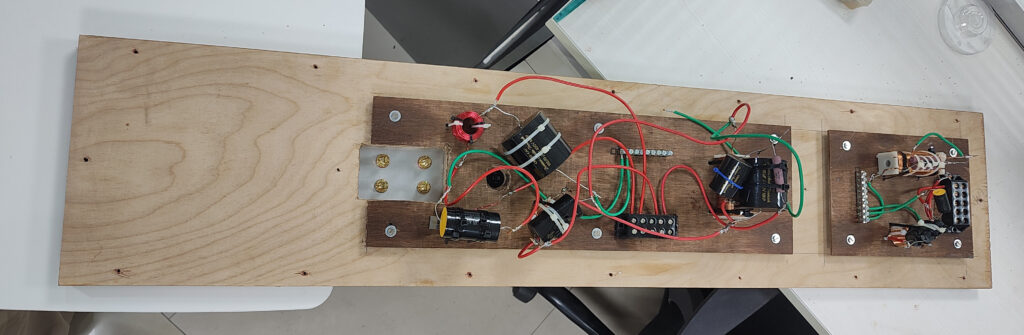
The smaller board on the far right carries the tweeter xo. The larger board carries the woofer and midrange xo. Each board has its ground terminal strip and its barrier connector strip.
After assembly, I did my usual trials with a set of 30+ short test tracks which I use to test any speaker. The videos below are taken with one speaker being driven by my Roksan amp, which has adequate power to drive most speakers. The source is FLAC files delivered through a very clean Topping USB DAC.
We spent time on extensive listening sessions, with various friends at various points. Some of these friends have high-end systems of their own (by my definition, exceeding USD 100,000 for the full setup) and most have experiences with careful listening sessions.
It is most important to audition new or unfamiliar gear with a variety of genres of music. There are many very expensive audiophile speakers which are not designed to handle a variety of genres, and are basically engineered to deliver a certain “sound”, for which, it is hoped, there is a large enough community of well-heeled buyers. They shine with Norah Jones, Diana Krall, and Chesky albums, but not with classic rock of the 70s and 80s. They make symphony orchestras sound “sweet” and lacking in bite. Many audiophile systems (specially those driven by low power tube amps) cannot handle the dynamics, transients, and impact of hard rock, EDM, rap, or any other edgy or highly dynamic types of music. In some sense, there is a culture of your uber-expensive equipment dictating your taste in music.
Personally, my taste in the “flavour” of systems is for something which is detailed and nuanced enough for long listening sessions but without any of the “niceness” which makes systems choke on, say, “Paradise City” (Guns’n’Roses) or “Bodysnatchers” (Radiohead). I usually love PMC or ATC systems designed for studio reference use.
Some more trial session shots:
Crossover mod
Feedback from members on diyaudio.com and from an amp designer friend pointed out that there was a technical error in my crossover: C9 + C10 + C14 gave the amp a pure capacitive path to short its output. At high frequencies, outside the audio band, this could blow the amp, and this scenario is not very unlikely. So my crossover needed to play nice. Therefore, I added some resistors in the path, and kept the overall response curve almost unchanged.
Here’s the modified crossover, with R10 added and C14 reduced.
And here is the old and new SPL curve: I am claiming that the difference will be inaudible:
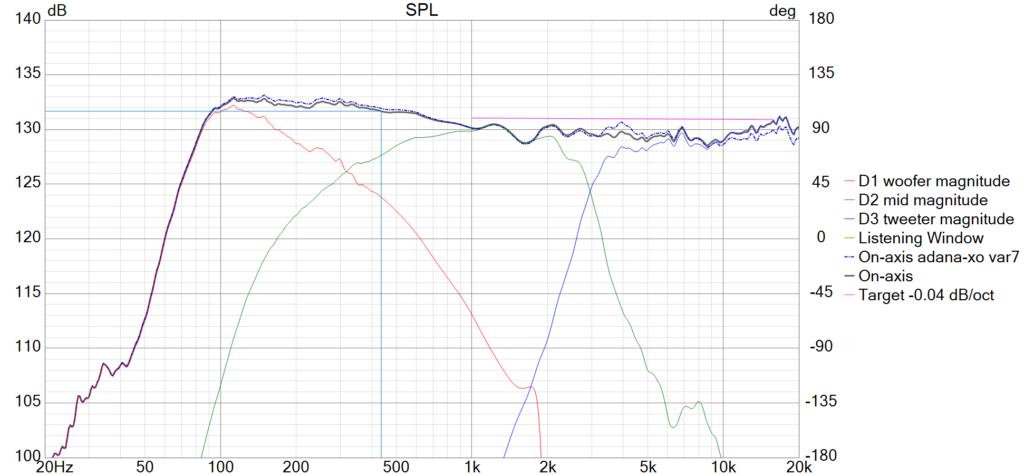
(If you think you’re seeing a tiny change in the 100-500Hz band too, don’t sweat: it’s because I was playing with C6 and changed it from 120uF to 100uF. This has nothing to do with the capacitive-path of the tweeter.)
So this modified crossover will ship with the Adana now.
I also had detailed chats with a speaker designer friend who had worked with the SB26CDC and SB26ADC on various projects, and he confirmed that the 5KHz SPL peak I had seen in my tweeter measurements were not a product of edge diffraction — they were a “feature” of these tweeters. He said he’d found this peak to have an irritating impact on the sound, and had had to notch it out, just like I had done. So this put my mind at rest about this tweeter SPL issue.
The sound
This is how I see the sound.
- The whole stack is low distortion metal diaphragm drivers, which bring in their precision and lack of a certain “smudging” or “rounding” which softer cones often bring. You get a certain cleanness which some will consider superb, others will consider over-etched. I have heard metal-cone systems before, and the Adana does not have any edge, harshness or shouty texture I’ve heard elsewhere which are common in less carefully designed speakers. The not-very-low crossover frequency between midrange and tweeter (3KHz) had the danger of shining a hyper-detailed spotlight on the upper mids, but that has not been the case. (This happens if the cone breakup region of the midrange was allowed to be audible in the output.)
- There is a remarkable evenness and lack of colouration in the mids and highs. Nothing seems out of place. You don’t realise that other speakers are coloured till you encounter a less coloured speaker, I guess. My Bihagda is more coloured than this, something which I would never have been able to say unless I’d compared these speakers side by side.
- The bass is very clean (I like metal cone bass) but it’s also suprisingly powerful. The initial two minutes from “Hotel California” from the “Hell Freezes Over” album, for instance, sounds hard, clean, and punchy.
- I was pleased as punch that the BSC effect I had given to the SPL response in the crossover seemed to yield a very good, pleasant response. This is the sound of a filled-out bass. Some may like a slightly leaner bass, it’s a matter of taste. But the Adana’s tuning makes it great fun at low to moderate levels, where a leaner bass tuning would have made the music sound drier.
- “Paradise City” (Guns’n’Roses) and “Jiji-Rhy” (from the album “Rhydhun” by Taufiq Qureshi) sound better here than any 2-way, any MTM Asawari, I’ve heard. But I think the Darbari was a slight bit cleaner. Maybe the sealed bass of the Darbari had something to do with it.
- “Bodysnatchers” (Radiohead) sounded very good. It’s probably not easy to beat this performance with any commercial speaker less than USD 20,000, and some high-end speakers much more expensive than USD 20,000 too mess up these tracks.
- Mridangam and pakhawaj sound excellent.
- Voices (Bob Dylan, Harry Belafonte, Joan Baez, Chhannulal Mishra) have a precise balance of delicacy, detail, and human warmth. No element of coldness or edge here.
- Guitar sounds a dream. “Friday Night in San Francisco”, or anything by Al de Meola or John Williams (the classical guitar wizard) sound spectacular.
- Violins and piano too sound perfect in timbre. Violins have just the right degree of edge to make them believable.
Nothing much else to say. These have turned out a success. In many areas, I prefer the Adana to the Darbari, my previous top ranker. Perhaps the only thing the Darbari beats the Adana at is the slightly greater tightness of a sealed bass alignment. I am actually surprised that I am able to compare the fully active Darbari with the passive-xo Adana at all.
Sound to taste
The ability to tune the leanness or fullness of the bass by tweaking capacitor values C6 and C13 is a blessing — you can own your own Adana flavour. Increasing C13 and/or decreasing C6 will give you leaner bass.
To experiment with the Adana, you can try the following:
- Play with C6 and C13 as described above
- Build a sealed woofer chamber, drop the bass reflex. It’s surprising how powerful and punchy the bass continues to be even after the port of my prototype was blocked.
I expect the Adana Mark II to be slightly cleaner than the Adana, with a slightly tauter tuning of the bass.
The metal cone saga
I have shared my thoughts about metal cone (hard cone) drivers in detail in my design notes on the Darbari, and later in my notes about the Asawari Mark V. The Adana was the latest in that line, and the Adana Mark II will be the next. All these four designs used woofers, midbass, and midrange drivers from the same family: the Dayton RS series. It’s very unlikely that I’ll use the Dayton RS series for future projects where I need hard cones. There are more recent driver families available, which are easier to work with. (I’ve written in detail about these difficulties in my Darbari design notes.)
I am writing a couple of updated thoughts on the same theme here.
ONE. Recent metal cone drivers seem to handle cone breakup much better than Dayton RS. (The only earlier family of famous metal cone drivers I know are the Seas Excel magnesium cone drivers, with their famous copper phase plug, which were no doubt a visual inspiration for the Dayton RS. I have no personal experience with Seas Excel.) The Dayton RS were infamous for adding resonance distortion amplification, which newer drivers do not seem to do as much.
Resonance distortion amplification refers to the amplification of distortion where the harmonics fall in the band of resonance or cone breakup. Suppose that your metal cone driver has an ugly cone breakup resonance in the 3-6KHz peak. Suppose the driver gets a 1.5KHz signal. This will be in the middle of the cone-breakup band. The driver will then amplify the H3 disproportionately. Thus, the designer may be caught on a sticky wicket. She may think she’s sending just a 1.5KHz signal, which is well outside the cone-breakup band, but the driver will amplify its H3 and throw it out with the original signal, colouring the sound.
Recent metal cone driver families have much less of this problem, I am told. So I will use SB Acoustics NAC and CAC drivers as my mainstay metal cones. I may use Dayton RS metal cones in future only as woofers in 3-ways.
TWO. Designing 2-way speakers with metal cones makes the problem much more challenging overall, because the larger midbass drivers needed in 2-way designs have their cone-breakup bands lower in the frequency range, thus requiring a lower Fc and steeper slopes.
Since the Adana is my first experiment with smaller midrange drivers, not midbass drivers, I found it easier to design the midrange LPF without going through the song and dance of the steep crossover in the Asawari Mark V. I’ll keep this in mind — this is a good reason to do 3-ways when using metal cones.
ALTERNATIVES. I will explore the following families.
- SB Acoustics NAC and CAC will be my mainstay metal cones now. They have radial ridges in their cones which reduce the cone breakup effect. It’s a very innovative idea. They are also only somewhat more expensive than the Dayton RS, and a decade newer.
- Purifi metal cone: high price, extremely low distortion, incorporates modern ideas in driver design. An example.
- Not-quite-metal cones. These are new hard cone drivers which are not metal cone.
- Wavecor glass fibre cones. An example.
- SB Acoustics CRC series: Rohacell/carbon fibre sandwich cone. An example. Also, Audax.
- Textreme cones: SB Satori, Seas.
- Accuton ceramic diaphragm drivers. They are not “cones”. Extremely high prices.
Here too, I intend to explore advanced drivers for midranges in 3-way designs, and more conventional metal cones for woofers. I am seriously thinking of a pair of SB CAC woofers mated to a Satori MR13 or MR16 Textreme midrange for one of my next designs.
To set the record straight, I love good paper cone drivers. The Bihagda and the Asawari Mark IV both use them. In many cases, I like the cleanness of the sound of hard-cone drivers more, and I have invested in learning the difficult art and science of crossover design for hard cones with sharp cone breakup behaviour. And in any case, these days paper cones are often not just paper, they have other fibres mixed in to create composite materials which give the superior damping of paper with enhanced stiffness.
-x-x-x-x-x-